


How to Install Safety Valves and Pressure Relief Valves
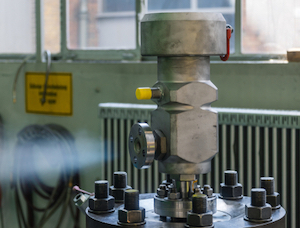
Figure 1: Pressure safety valve
Proper installation of safety and pressure relief valves is crucial for industrial safety. These valves prevent accidents by releasing excess pressure from systems like boilers and pipelines, ensuring they operate within safe limits. Effective installation of these valves is essential to prevent equipment failure and safety hazards. This article explores the best practices and adjustment procedures for installing safety and pressure relief valves in compliance with industry standards and regulations.
Table of contents
- Safety valve vs pressure relief valve
- Installing a safety valve or pressure relief valve
- How to adjust a safety valve or relief valve
- FAQs
View our online selection of safety valves and pressure relief valves!
Safety valve vs pressure relief valve
Safety valves and pressure relief valves are installed in the same way but function differently. When the pressure in the system reaches the set point of a safety valve, it opens quickly to lower the pressure fast. It doesn't start to close until the pressure almost returns to its closing pressure. A pressure relief valve starts to open when the system's pressure hits its set point too. But, it opens gradually as the pressure goes up and closes gradually as the pressure goes down. This valve helps to manage pressure without quickly reducing it. Read our safety valve vs pressure relief valves article to learn more.
Installing a safety valve or pressure relief valve
This section covers guidelines for before, during, and after the installation of safety valves or pressure relief valves. The guidelines apply to both types of valves.
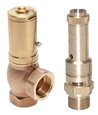
Figure 2: Relief valve
Before installing
- Storage: If not immediately installing a valve, store it in its original container in a dirt-free environment. Check with the manufacturer for guidance on recommended storage temperatures.
- Packing: Ensure that no packing material is in the valve and prevent any from entering the valve when removing the material.
- Damage: Investigate the valve for any damage it may have taken during the shipping process.
- Nameplate: The valve’s specifications written on its nameplate should match the specifications needed for the system.
- Port covers: If the inlet and outlet ports have covers, wait to remove them until installation.
- Lifting and carrying: If the valve has a handle or lever for manual operation, do not use it to lift or carry the valve.
- Testing: It is highly recommended to have a certified technician test a safety valve or pressure relief valve’s set pressure and seal tightness before installation.
During installation
After taking sufficient precautions during the pre-installation phase, install a safety or pressure relief valve using the following guidelines.
- PPE: Wear PPE (personal protective equipment) such as gloves, eye protection, and hard shoes.
- Depressurization: Depressurize the system upstream of where the valve will be installed.
- Location: Install the valve close to the pressure source (e.g., air tank). If there is a bend or elbow between the valve and the pressure source, install the valve at least 8-10 pipe diameters from the diverter.
- Vertical position: Install valves in a vertical position with the stem facing upwards unless the valve design explicitly allows a different orientation.
- Pipe size: Ensure the piping diameter is at least equal to the diameter of the inlet and outlet ports.
- Lubrication: Avoid lubrication to prevent overtightening. Even Teflon tape provides some lubrication, so take care if using Teflon to seal a threaded connection. Also, with Teflon, leave one to two threads on the connection’s end uncovered and do not use Teflon on internal threading.
- Overtightening: Overtightening can damage the valve. Follow the manufacturer’s recommendation on how tight the connection should be.
- Flanged connections: Tighten the bolts of flanged connections in a star pattern rather than tightening consecutive bolts. The latter can lead to an improper distribution of tightening.
- Pressure fluctuations: Install the valve away from zones of pressure fluctuation—for example, turbulent areas near other valve outlets.
- Support: Ensure the valve is properly supported to avoid undue stress on the valve body.
- Steam: Install safety and pressure relief valves above a steam pipe to avoid condensation interacting with the valve.
After installation
- Testing: After installing a pressure relief or safety valve, test it by slowly delivering pressure to it until the pressure reaches the set pressure limit. Ensure the valve functions as it should.
- Adjustment: Adjusting a pressure relief valve may be necessary if the valve opens at the wrong set pressure while testing.
- Maintenance schedule: Ensure a schedule is in place for regularly testing the valve. Pressure relief and safety valves require testing at least once a year. Valves that operate more frequently may require more frequent testing.
How to adjust a safety valve or relief valve
Note: Certain safety and relief valves are non-adjustable, meaning they have a fixed set pressure and one cannot change the pressure at which the valve opens; it is preset by the manufacturer. For valves that can be adjusted, the process below may vary from manufacturer and specific valve design.
Adjustable safety valves let the user set the pressure at which they open, offering flexibility for different requirements. The basic process for adjusting the set pressure of a pressure relief valve is generally the same for both air and water systems.
- Ensure there is no pressure applied to the valve.
- Remove or loosen the spring cap to access the adjustment screw.
- To adjust the set pressure:
- Turn the adjustment screw clockwise to increase the pressure. This action compresses the spring further, requiring more force (and thus higher system pressure) to lift the valve and release pressure.
- Turn the adjustment screw counterclockwise to decrease the pressure. This reduces the spring's compression, allowing the valve to open at a lower pressure.
- Adjust the valve in small increments. A common guideline is to adjust no more than one full turn at a time before retesting the set pressure. This helps prevent overshooting the desired pressure setting. Attaching a calibrated pressure gauge to the system piping close to the safety valve can help determine if the valve opens at the desired set pressure.
- After adjusting, it's crucial to test the valve to ensure it opens at the correct set pressure. This can be done using a pressure testing facility or, in some cases, within the system if a controlled test environment can be created. Depressurize the valve if further adjustments are needed.
- Replace the spring cap after the process.
- Note: Manufacturers specify a pressure range (for example, 16-32 bar) in the product specifications. This means the valve can be set to activate (open) when the system pressure reaches a minimum of 16 bar and a maximum of 32 bar, depending on the needs of the system it's protecting. Also, certain safety valves have blowdown rings to adjust the process that controls the valve's blowdown - the difference between the pressure at which the valve opens (set pressure) and the pressure at which it reseats (closes).
FAQs
Where is a safety valve usually located?
Safety valve installation needs to be near the pressure source, for example, the air tank. If the valve is too far away from the pressure source, it may not function precisely.
Can an adjustable air pressure relief valve be set to any pressure?
An air pressure relief valve can be adjusted only within its specified adjustment range provided by the manufacturer.
Is a pressure relief valve necessary?
Yes. Pressure relief valves ensure that pressure is not able to build to dangerous levels within a system.
