


Maintain, Troubleshoot, & Repair a Pneumatic Rivet Gun
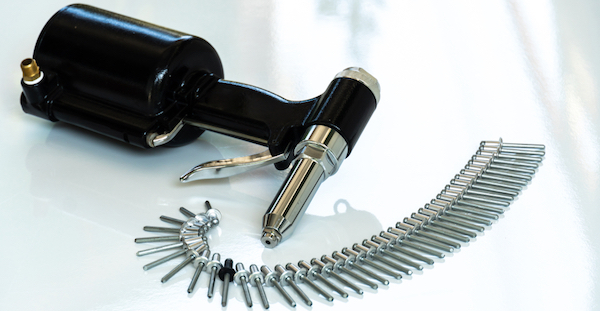
Figure 1: A pneumatic rivet gun and pop rivets.
Due to their fast and easy operation, pneumatic rivet guns, also known as air rivet guns, make large riveting projects feasible and efficient. However, if not cared for correctly, an air rivet gun can quickly malfunction or break. Without enough lubrication, pneumatic rivet gun components wear out or do not operate as intended. This article discusses how to properly maintain a pneumatic rivet gun and examines common issues the tool has and how to correct these issues. To learn more about a rivet gun’s operation, read our pneumatic rivet gun guide.
Table of contents
View our online selection of pneumatic rivet guns!
Pneumatic rivet gun components
An air rivet gun has several components. Pneumatic rivet guns typically come with multiple nose pieces for differently sized rivets. The nose piece (Figure 2 labeled A) holds the pop rivet. The jaw assemblage cover (Figure 2 labeled B) protects the jaw assemblage (not visible in Figure 2) from debris.
The jaw assemblage contains the jaws, a plunger, and a spring.
- Jaws: The jaws grip the mandrel and pull it back to break it off the pop rivet during installation.
- Plunger: The plunger has a v-shaped head, which presses against the jaws to open them when the user is not pulling the trigger.
- Spring: The spring pushes the plunger forward towards the jaws when the user is not pulling the trigger.
The capture cup (Figure 2 labeled C) at the back of the rivet gun catches mandrels when they break off the rivet. If a pneumatic rivet gun does not have a capture cup, the user tilts the gun downward to drop the mandrel from the jaw assemblage.
When the user compresses the trigger (Figure 2 labeled D), the valve (not visible in Figure 2) at the air inlet (Figure 2 labeled E) opens to allow air to flow into the air cylinder (Figure 2 labeled F). The piston (not visible in Figure 2) within the air cylinder moves upward, which operates the components in the jaw assemblage. Read our rivet gun guide for more details on how to use a rivet gun.
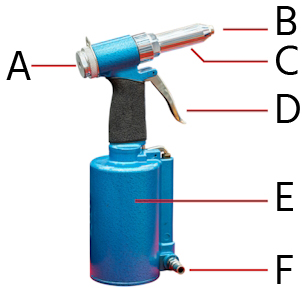
Figure 2: An air rivet gun and components: nose piece (A), jaw assemblage cover (B), capture cup (C), trigger (D), air inlet (E), and air cylinder (F). Important components not visible in this image but discussed in this article: jaw assemblage, jaws, plunger, spring, valve, and piston.
Pneumatic rivet gun maintenance
With regular maintenance, a pneumatic rivet gun can last many years. Routine maintenance includes proper lubrication and inspection of the jaw assembly and air cylinder. Use a fogger, FRL unit, or oiler to lubricate an air rivet gun. Or, lubricate it manually with air tool oil.
- General lubrication: To manually lubricate a pneumatic rivet gun, put 3 to 4 drops of air tool oil in the gun’s air inlet before the air hose is connected. If using the tool over several days, lubricate at the beginning of each day. If using the tool continuously throughout a day or several days, lubricate the tool every 1-2 hours.
- Jaw assembly: Over time, the jaw assembly can slip from its position. If not aligned properly, the jaw assembly cannot effectively pull rivet mandrels to install rivets. Periodically remove the jaw assembly cover to determine whether the jaw assembly is aligned correctly. The distance from the front of the assembly to the threaded area on the rivet gun’s body should be the same as the distance indicated on the specialized wrench that comes with the rivet gun.
- Air cylinder: Most pneumatic rivet guns come from the factory with lubrication in the air cylinder. If this is not the case, unscrew the bottom cap of the air cylinder. Use a tool to push the piston down and apply lubricant to the inside of the cylinder. Even if the air cylinder is initially lubricated, periodically inspect this area to check if the lubricant is still there or has worn off. It is unlikely the air cylinder will need relubrication during its lifetime, but this examination should still be a part of regular maintenance.
Air rivet gun troubleshooting
The following table covers common issues pneumatic rivet guns encounter, what these issues may indicate, and how to fix them. Most fixes involve clearing debris from the airline, air cylinder, or jaw assemblage or applying lubrication where needed. However, if a part needs replacement, check first with the air rivet gun’s manufacturer.
Table 1: Pneumatic rivet gun troubleshooting
| Issue | Potential cause | Fix |
| Mandrel is stuck in jaws. | Dirt and shavings accumulated in the jaws or jaw assembly cover. | Disassemble the jaw assembly and clean each component. Then lubricate all components except for the jaws. |
Air rivet tool only blows air. |
Piston is worn. | Replace the piston. |
| Valve is worn. | Replace the valve. | |
| Debris in the airways. | Clear debris from the airways. | |
| Pneumatic rivet gun does not shut off. | O-rings in the throttle valve are worn. | Replace o-rings. |
Riveter does not work. |
No air pressure. | Examine the air compressor and air hoses. Ensure the air is at 90 psi (6.2 bar) and air lines are not tangled. |
| Trigger is not working. | Examine and fix the trigger or replace it. | |
Weak pulling action. |
Valve blocked. | Clear blockage by opening the air inlet and removing any debris. |
| Dirt or gum on components. | Flush rivet gun with gum solvent. If the problem continues, take the machine apart and clean and lubricate the internal parts except for the jaws. | |
| Low air pressure. | Ensure the compressor has the correct CFM rating for the air rivet gun. Examine the compressor’s regulator setting and set the air pressure to 90 psi (6.2 bar). Also, look for loose connections. | |
Inadequate riveting force. |
Dirt or gum on components. | Flush rivet gun with gum solvent. If the problem continues, take the machine apart and clean and lubricate the internal parts except for the jaws. |
| Low air pressure. | Ensure the compressor has the correct CFM rating for the air rivet gun. Examine the compressor’s regulator setting and set the air pressure to 90 psi (6.2 bar). Also, look for loose connections. | |
| Valve blocked. | Clear blockage by opening the air inlet and removing any debris. | |
| One or more components are worn. | Replace worn components. | |
| Trigger is not working. | Examine and fix the trigger or replace it. | |
Jaws not holding on to the mandrel. |
Blockage in jaws, potentially a stuck mandrel. | Clean the jaw components, but do not lubricate the jaw’s “teeth” that hold the mandrel. |
| Worn jaws or plunger spring. | Replace parts. | |
| Loose jaw assemblage. | Tighten the jaw assemblage. | |
| Jaws locked closed. | Jaws are dirty or the nosepiece is loose. | Clean and tighten necessary parts. |
| Fires right when the air hose is connected and air is turned on. | Malfunctioning trigger. | Examine and fix the trigger or replace it. |
|
Significant air leakage (some air leakage is normal) |
Valve is blocked or worn. | Unblock or replace. |
| O-ring(s) damaged. | Replace o-rings. |
Read our articles on manual and electric rivet guns for more details on the parts and operation of manual and electric rivet tools.
