


How To Replace a Circuit Breaker
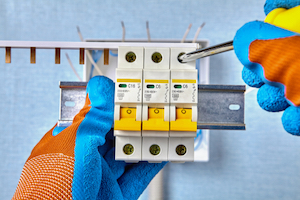
Figure 1: Installing a circuit breaker at home
Circuit breakers protect electrical circuits from damage caused by overloading or short circuits. However, due to wear and tear, circuit breakers can eventually develop faults and fail to function as intended, leading to potential safety hazards. In such cases, it becomes necessary to replace the circuit breaker. This article provides a guideline to determine if a circuit breaker is faulty and a step-by-step guide on how to remove and replace a circuit breaker. Read our circuit breaker overview article for a complete guide on circuit breaker working and types.
Note: Take proper precautions when installing/replacing circuit breakers, including following all safety guidelines and using the correct equipment and techniques. This article is for informational purposes only and should not be used as a substitute for professional advice or guidance.
Table of contents
- How to reset a circuit breaker
- Troubleshoot the circuit
- Test the circuit breaker
- Replace the bad circuit breaker
- FAQs
View our online selection of circuit breakers!
How to reset a circuit breaker
Circuit breakers trip and interrupt the flow of current to a circuit due to various factors like overloading, short circuits, or ground faults. The tripped circuit breaker must be reset to restore power to the affected zone.
- Turn off the switches and unplug any appliances connected to the circuit that lost power. Attempting to reset the breaker while the circuit is still overloaded could cause it to trip again immediately.
- Access the electrical panel. The electrical panel is a metal box usually found in the garage, utility room, or basement. Open the panel door and look for an index that indicates which area of the building each breaker corresponds to.
- A circuit breaker can be in three positions: on, off, or tripped. The 'on' and 'off' positions will be marked on the breaker. The switch in a tripped circuit breaker will be between the on and off positions. Locate the circuit breaker that has tripped.
- To reset the breaker, move the switch to the 'off' position and click it back into the 'on' position.
- Finally, check that power has been restored to the circuit and the affected room.
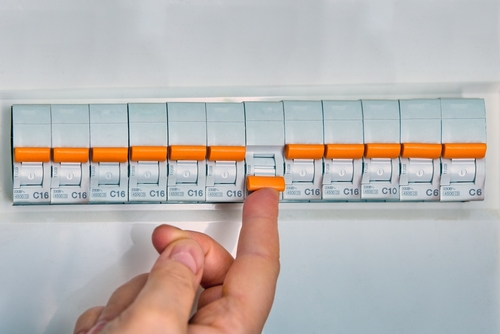
Figure 2: Turning on the circuit breaker on the control panel after it has tripped due to overload.
Troubleshoot the circuit
If a tripped breaker fails to reset or repeatedly trips even after resetting, it is likely that there are too many appliances connected to the circuit. The breaker trips because it is functioning correctly. However, the problem could also arise from a damaged plug or a short circuit in a fixture. Faulty wiring could also be the cause. Hence, it is essential to determine whether the issue is within the circuit or the circuit breaker itself.
- Turn off all lights and unplug all appliances from outlets that are on the circuit. Look for hot terminals (terminals of an electrical component or device that are connected to a power source that can become hot due to the flow of electrical current through them) and check if the plugs are overheated. If one of the plugs is hot to the touch, it could be the problem source.
- Reset the breaker once again. If the breaker stays on, plug in the appliances one by one until the circuit breaker trips again. Repair or discard the appliance that is causing the breaker to trip.
- Turn on the appliances. If the circuit breaker trips again, there may be an issue with the switch or fixture. If a particular appliance or light trips the breaker, reset the circuit breaker once again; test the isolated fixture to help determine if it is the cause.
If the source of the problem cannot be pinpointed, it is possible that the issue is with the circuit breaker itself.
Test the circuit breaker
A circuit breaker is generally not repaired but rather replaced if it exhibits signs of overheating or has a burnt smell. However, a malfunctioning circuit breaker may not necessarily display visible signs of failure; hence it is essential to test a circuit breaker using a multimeter. Perform the following steps to test a circuit breaker:
- Turn off the main circuit breaker that powers the entire panel.
- Loosen the screws on the electrical panel to remove the metal frame around the circuit breakers.
- Locate the suspect circuit breaker on the exposed panel and unscrew the wire from the breaker before removing it.
- Rotate the dial on the multimeter and set it to measure 'ohms.' Place one lead on the screw terminal and the other on the supply terminal of the breaker.
- Turn the breaker to the 'off' position while keeping the leads in contact at both points. The breaker should ideally read '0L,' indicating a very high resistance.
- Repeat the process with the breaker turned on. If the multimeter reads '0L,' the breaker is not functioning properly and needs to be replaced. This means that the probes are not making proper contact with the circuit, and the circuit has a very high resistance.
Read our article on circuit breaker troubleshooting for more information on the symptoms of a bad circuit breaker and how to troubleshoot them.
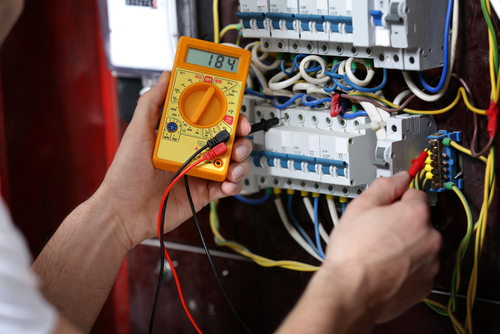
Figure 3: Using a multimeter to measure the voltage in a service panel
Replace the bad circuit breaker
Finding a suitable circuit breaker replacement
Finding a proper replacement for a circuit breaker requires a few steps.
- Determine the circuit breaker type: The first step is to determine the type of circuit breaker that needs to be replaced. There are various types of circuit breakers, and each type is designed for a specific purpose. You can easily identify the type of circuit breaker by checking the label and rating on the breaker itself.
- Check the amperage rating: The next step is to check the amperage rating of the circuit breaker. The amperage rating of a circuit breaker is the maximum amount of current that it can handle before tripping. The amperage rating is typically marked on the front of the circuit breaker. Make sure to replace the circuit breaker with one with the same amperage rating as the original.
- Check the voltage rating: It is also important to check the circuit breaker's voltage rating. The voltage rating of a circuit breaker is the maximum voltage it can handle. The voltage rating is also usually marked on the front of the circuit breaker. Choosing a circuit breaker with the wrong voltage rating can cause the breaker to malfunction or fail, leading to serious safety hazards.
- Choose a compatible brand: It is important to choose a replacement circuit breaker from a brand compatible with the electrical panel or system you are working on. However, if the brand is no longer available or incompatible with your electrical panel, look for a replacement listed as compatible. Different brands have different sizes and designs, and choosing an incompatible brand can result in an improper fit or installation, leading to safety hazards.
How to change a circuit breaker
Once the new circuit breaker is selected, perform the following steps to replace the old circuit breaker:
- Turn off the power: Locate the main breaker and turn it off. Afterward, turn off all branch circuit breakers. Use a multimeter to verify that the panel is not receiving any electricity.
- Remove the old circuit breaker: Loosen the terminal screws that connect the circuit wires to the breaker. Using a flathead screwdriver, you can gently pry the circuit breaker out of its slot. Be careful not to damage the electrical panel or other components. You should note the circuit breaker's position before removing it, as you will need to install the new circuit breaker in the same position.
- Install the new circuit breaker: Slide the new circuit breaker into the same slot as the old one. Then, connect the circuit wires to the terminal screws on the new breaker, ensuring the wires are secure and tightened properly. You should also ensure that the new circuit breaker is appropriately sized for the load it will be protecting and compatible with the electrical system you are working on. Check and tighten any loose terminal screws on other breakers.
- Test the circuit breaker: Inspect the circuit breaker to ensure there are no signs of damage or wear and that it is securely installed in the electrical panel. Use a multimeter to test each breaker to ensure they are functioning correctly.
- Replace the panel cover: Replace the cover plate on the electrical panel and secure it with screws or clips. Ensure the cover plate is installed correctly, and all screws or clips are tightened properly. Turn on the main breaker and then turn on each branch circuit breaker individually.
Read our articles on miniature circuit breakers, residual current circuit breaker,smart circuit breakers and earth leakage circuit breakers for more details on the features of various circuit breaker types.
FAQs
How to remove a circuit breaker from a panel box?
To remove a circuit breaker from a panel box, turn off the main power supply, locate the breaker, and use a screwdriver or pliers to loosen the screws or clips that hold it in place. If the breaker has clips, gently wiggle it back and forth while pulling it out of the panel box.
