


How To Find a V-belt Replacement
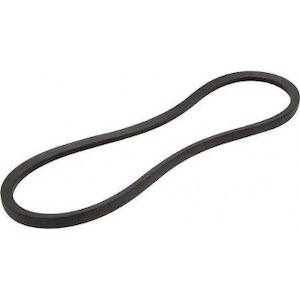
Figure 1: V-belt
A v-belt is a rubber belt with a trapezoidal cross-section used for driving mechanisms in an engine, such as fans and pumps. When a v-belt gets worn out, it is difficult to determine the type and dimensions of the belt to find a proper replacement. This article discusses finding a v-belt’s original type, length, and width and how to install a replacement belt.
Table of contents
- Why replace a v-belt?
- How to identify a v-belt
- How to measure a v-belt
- Example
- V-belt installation
- FAQs
View our online selection of V-belts
Why replace a v-belt?
A well-designed and properly aligned v-belt drive is highly efficient. Over time, though, maintenance and installation factors (e.g., misalignment, tension, and worn-out sheaves) negatively affect the v-belt’s effectiveness. Often, high loads and high temperatures contribute to v-belt failure. Hence, it is essential to inspect a v-belt for possible failure and replace it if needed.
How to identify a v-belt
To identify a v-belt, read the part number on the v-belt if the branding is still intact. However, after many hours of use, the label may be worn out and may not be legible to read. In this case, it is essential to find out the belt's original dimensions, as discussed below, to find a proper replacement.
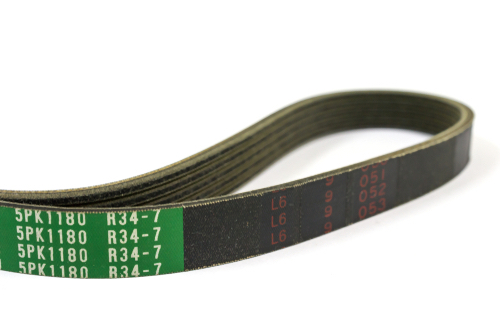
Figure 2: Part number labeled on a v-belt.
A v-belt is characterized by its top width and depth, as seen in Figure 3. For example, a top width of 7/8” and a depth of 17/32” is a “C” belt, as seen in Table 1. Use the identification chart given in Table 1 to know each type of v-belt’s top width and depth.
Table 1: V-belt identification chart
| V-Belt Type | Top width (mm / in) | Depth (in inch) |
| 3L | 9.5 / 3/8 | 5.6 / 7/32 |
| 4L | 12.7 / 1/2 | 7.9 / 5/16 |
| 5L | 16.7 / 21/32 | 9.5 / 3/8 |
| A | 12.7 / 1/2 | 7.9 / 5/16 |
| B | 16.7 / 21/32 | 11.1 / 7/16 |
| C | 22.2 / 7/8 | 13.5 / 17/32 |
| 3V | 9.5 / 3/8 | 7.9 / 5/16 |
| 5V | 15.9 / 5/8 | 13.5 / 17/32 |
| 8V | 25.4 / 1 | 23.0 / 29/32 |
How to measure a v-belt
Regardless of the type of v-belt, use the following measurements to find a proper replacement for it:
- Depth and top width
- Length
Use v-belt measuring tools (e.g., hard ruler, hard tape measure, or soft tape measure)to perform the following steps and determine the length, top width and depth of the v-belt:
- The depth and top width: Measure across the top across the top of the tape to get the width of the belt (Figure 3 labeled A) and measure the straight distance across the cross-section to get the depth (Figure 3 labeled B). This means that the user needs to measure the widest part of the belt (thick section) for the width and then measure down from the widest part to the narrowest part of the belt for the depth.
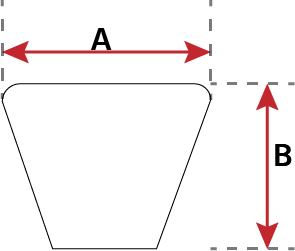
Figure 3: Top width (A) and depth (B) of a v-belt.
- Length: Due to the thickness of a v-belt, the outer length (circumference) is different from the inner length for each belt type (Figure 4). Each belt type lists the inner circumference of the belt after the letter of the v-belt’s part number. For example, A76 means an ‘A’ belt with an inner circumference of 76 inches. To measure the outer circumference, it is necessary to subtract the number of inches based on the type of v-belt owned, as seen in Table 2. For example, if the outer circumference is 79 inches, subtract 3 inches (details in Table 2) to get the inner circumference as 76 inches, and designate the v-belt as B76.
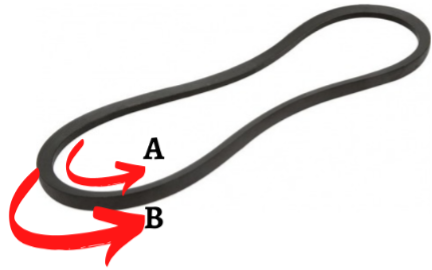
Figure 4: Inner length of a v-belt (A) and outer length of a v-belt (B)
Table 2: Relation between the outer and inner circumference of each belt type
Belt type |
Value (in inches) to be added to the belt number |
EXAMPLE |
|
| V-belt part number | Outer length (in inches) | ||
| A | 2 | A76 | 78 |
| B | 3 | B76 | 79 |
| C | 4 | C76 | 80 |
| D | 5 | D100 | 105 |
| E | 6 | E145 | 151 |
| AX | 2 | AX60 | 62 |
| BX | 3 | B50 | 53 |
Measuring the outer circumference
Use the following v-belt measurement tools to determine the belt’s outer circumference.
- Using a hard tape/ruler: To find the total outer length of the belt, mark a point on the belt as the starting point. Place this point at the beginning of the hard ruler or tape, and roll the belt on the tape until the starting point disappears and then reappears. Note the distance covered on the ruler to get the length of the tape. Make sure to keep the tape/ruler steady on the ground; otherwise, the measurement may be inaccurate.
- Using soft tape: Roll the soft tape over the v-belt to measure the length of the belt.
- Analytical method: Read our article on the v-belt size calculator for details on how to determine the length of a v-belt analytically.
Note: Once the outer circumference is measured, use the values given in Table 2 to calculate the inner circumference of each belt type to designate the v-belt correctly.
Inner circumference
If the belt is attached to a pulley, tie a string around the belt on the pulley and measure the length of this string to get an estimate of the belt’s length. If there is no belt attached to the pulley, tie the string on the inside part of the pulley to take the measurement, which estimates the belt’s inner length.
Example
This example uses a v-belt, with a worn out label, that needs replacement. Perform the following steps to identify the belt type correctly:
- Measure the top width and depth of the belt using the method discussed above. Compare the value with the values given in Table 1 to determine the belt type. A v-belt with a top width of 1/2” and a depth of 5/16” is an A belt.
- Identify whether the v-belt is notched or covered externally. A notched belt has grooves running perpendicular to the belt’s length, thus reducing the bending resistance of the belt. Add an ‘X’ to the type if the belt is notched. Designate a notched A belt as ‘AX’; otherwise, the belt is just ‘A.’
- Measure the length of the v-belt’s outer circumference as discussed above. Suppose the outer circumference is 78” and the belt is notched. Therefore, the inner circumference is 76”, and the v-belt is AX76.
V-belt installation
Perform the following steps to install a v-belt on a pulley drive:
-
Check pulleys:Check the pulleys for any wear or foreign materials before v-belt installation. Replace the worn-out pulleys to ensure good contact between the belt and the pulley. Worn-out pulleys may lead to:
- Reduced belt life
- Belt slippage
- Reduced power transmission of the drive
- Vibrations
Note: It is important to use a set of all new belts, preferably of the same brand. Also, do not mix different v-belt constructions (like banded, raw edge, and cogged). Using a combination of old and new belts can lead to slippage of used belts, reduced power transmission of the drive, non-uniform tensioning, and reduced working life of the new belt.
- Installing v-belts
- Place belts on the drive.
- Never force the belt into the pulley using a lever. Using a lever can break the belt’s tensile cords and permanently twist the belt, leading to the turning of the belt within the pulley groove while running.
- Calculate the center distance between pulleys and make provisions to adjust the length during installation. This helps ensure proper v-belt tensioning and improved belt life.
- Move the driver unit forward to slip the belt into the pulley grooves without causing damage to the belts.
- Place belts on the drive.
- Checking alignment: Align the v-belt properly after installation to ensure a smooth operation. A good alignment gives a longer life to the belt and the pulley.
- Re-tensioning: Check the tension on the v-belt during the first two-three days of operation. Re-tension if necessary.
FAQs
What are v-belts used for?
V-belts act as transmission belts. Driving mechanisms in an engine, such as fans and pumps, use v-belts.
How do you stop v-belt slip?
Prevent v-belt slips by adjusting its tension and changing worn-out pulleys.


