


Pressure Relief Valve Failure & Troubleshooting
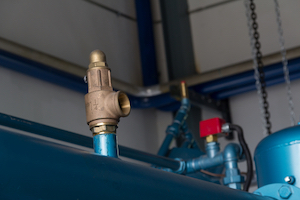
Figure 1: Pressure safety valve at the discharge line of a gas compressor.
Pressure relief valves and safety valves in the manufacturing industry can sometimes fail. Failure causes the valve to release pressure before the system reaches the maximum pressure or causes leakage and chattering. Troubleshooting the valve and the system for what’s causing the issues is a safe practice. This article explores the causes of pressure relief valve failure in a system and how to test the valve to repair or replace it.
Table of contents
- Failure in pressure relief valves
- Testing a pressure relief or safety relief valve
- How often to test a pressure relief valve
- FAQs
View our online selection of safety and relief valves!
Failure in pressure relief valves
Pressure relief valves and safety valves are essential to keeping hydraulic and pneumatic systems below set pressure. Depending on the installation, they can either:
- Reduce the downstream pressure to a constant level whenever it exceeds a threshold
- Maintain sustained pressures down- or upstream from the valve
- Reduce the peaks or pressure pulses to protect equipment installed downstream
A properly maintained pressure relief valve can last up to thirty years. However, the pressure relief valve can fail over time. It’s essential to recognize the signs to solve the problem quickly and keep the facility safe. There are multiple signs of pressure relief valve failures to watch out for while troubleshooting the system.
The system cannot reach a certain pressure
A system that cannot reach its designed pressure can be a sign of pressure relief valve failure that can cause a production slowdown. Checking the pressure relief valve can help determine the problem, and it is possible to fix the issue in some cases.
- Wrong calibration: If the pressure relief valve was calibrated to the wrong set pressure, it can release the media early. This can happen when there are design changes to the facility’s plant design and the pressure relief valve is not recalibrated to the system’s new normal operating pressure. Adjust the valve’s set pressure to address this issue.
- Wearing out: If the pressure relief valve is calibrated correctly and all other aspects of the system are functioning optimally, then it’s time to change the pressure relief valve. The valve can become damaged after years of service, and the dirt and dust from the environment can prevent the valve from closing fully. This often causes chattering in pressure relief valves, where the valve opens and closes rapidly, preventing it from operating correctly.
The system is over maximum pressure
If the system pressure builds to above the maximum pressure, a pressure relief valve or safety valve should open up to let off the additional pressure, keeping the facility and equipment safe. However, if the pressure relief valve does not open when the system pressure rises above the maximum set pressure, there is likely an issue with the valve. Ensure that the valve is calibrated to the correct set pressure, and also examine the facility thoroughly to determine what caused the excess pressure. Contaminants like dirt, dust, and corrosion can cause the valve to remain stuck. Replace the pressure relief valve if the excessive buildup cannot be cleaned. Read our article on pressure relief valve installation for more information on how to replace and install a new pressure relief valve.
Pressure relief valve leaking
A valve can leak for multiple reasons:
- Not fully closed: Dusty industrial environments can leave debris in the pressure relief valve, preventing it from closing fully which leads to leakage.
- Damage: Extreme temperatures and wear can deteriorate the pressure relief valve, causing damage (like a broken spring) over time. This affects their ability to close properly, causing leakage.
- Wrong size: A poorly sized valve doesn’t function properly and often leaks. Read our article on pressure relief valve sizing for more information on selecting and sizing these valves.
To fix a leaking pressure relief valve:
- Shut down the system when the pressure relief valve leaks.
- Determine the cause of the leak by carefully examining the pipelines and the valve. It is difficult to troubleshoot a leaking pressure relief valve as there are multiple potential causes. Perform quality in-line leak testing (discussed later) to determine the root cause of the leak.
- For the initial repair of the safety valve, tighten or replace the bonnet bolts and tighten the packing gland nuts. Ensure to follow the valve manufacturer’s guidelines.
- If the valve doesn’t work properly after the initial repair, perform any additional repairs if needed. If nothing works, replace the valve.
Testing a pressure relief or safety relief valve
Testing methods
There are three types of testing methods to test a pressure relief valve.
Bench testing
With bench testing, the user has to completely shut down the facility’s system and remove all pressure relief valves. These valves go to a laboratory to be tested and repaired as necessary. After repair, the valves reinstall into the system. Bench testing is the most thorough testing method; pressure relief valves undergo this testing method when manufactured.
Inline testing
The inline testing procedure doesn’t require the removal of valves or facility downtime. A trained technician can test the valves in the system to calculate their setpoints. Inline testing is popular for regular mandatory inspections and provides accurate results by eliminating the need for downtime. The method offers real-time, in-system reporting and also eliminates transportation-related damage.
Operated in place
Manual testing on site is possible for certain pressure relief valves. To perform an operated-in-place test, manually activate the test lever on the pressure relief valve. This test ensures that the valve can open and shut tightly, but it fails to verify at what pressure the valve opens and shuts. This is a basic test done quarterly or bi-annually on pressure relief valves and ensures the most basic functionality of pressure relief valves.
Test setup
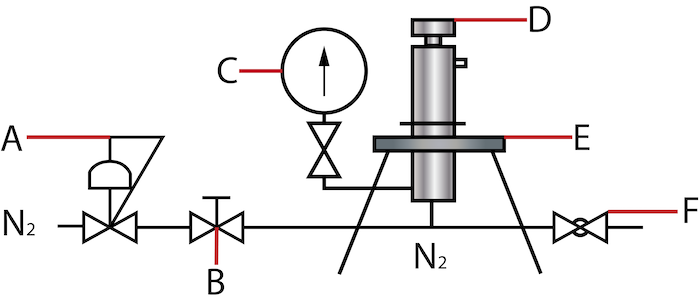
Figure 2: Testing a pressure relief valve: pressure regulator (A), needle valve (B), test gauge (C), pressure relief valve (D), test jig (E), and release point (F).
Figure 2 shows the functional testing procedure of a pressure relief valve. Before starting the experiment, check the pressure relief valve’s datasheets and ensure the experiment complies with the manufacturer’s guidelines. Also, check if the valve is correctly calibrated to its set point.
- Set up the pressure relief valve and the associated components, as seen in Figure 2.
- Connect the N2 line to the test manifold inlet (the system connected to the pressure relief valve).
- Adjust the pressure through a regulator (Figure 2 labeled A). The needle valve (Figure 2 labeled B) gradually allows the flow of media as the pressure changes in the regulator.
- Gradually increase the pressure until the pressure relief valve (Figure 2 labeled D) pops open. A “Pop Test” tests the pressure relief valve’s set pressure by compressing the pressure into the valve's inlet until it opens. The user compares the pressure that causes the valve to open with the set pressure of the valve to check whether the valve opens at the set pressure or not.
- Note the reading on the test gauge (Figure 2 labeled C) and compare it to the valve’s set pressure. Perform this step 2-3 times for confirmation.
- The acceptance criteria for the pressure relief valve depend on whether the recorded pressure lies within the tolerance values as per ASME codes given in Table 1.
- After the set pressure test, perform the leak test on the pressure relief valve. This test is done by maintaining the test pressure at 90 percent of the set pressure and counting the number of bubbles produced per minute. The leakage of air or nitrogen through the seat and disk of the pressure relief valve produces bubbles. API 527 provides acceptance criteria for the leak test:
- Count the number of bubbles produced in one minute.
- The value should be zero for soft seated pressure relief valves and should not exceed the value specified in Table 2 for metal seated valves.
- If the test confirms that the pressure relief valve’s leakage is not within the tolerance limit, there are a few ways to troubleshoot and resolve the leak.
- First, determine the cause of the leak. Check for mechanical damage in the valve, incorrect size, or dirt and debris obstructing the valve.
- Next, assess whether to repair or replace the valve. For example, replace the valve if it is damaged or the wrong size. Repair the valve if it can be cleaned and adjusted to operate smoothly.
Once the pressure relief valve functions well after repairing or replacing the damaged valve, implement a routine of regular maintenance and testing. A damaged pressure relief valve can pose severe hazards to the functionality of a facility.
Note: Do not remove the manufacturer’s seal or adjust the setting during the tests.
Table 1: ASME code stating the tolerance values with respect to the set pressure
|
ASME code section I |
|
| Set pressure | Tolerance |
| 1.0 - 5.0 Kg/Cm2 G | ± 0.14 Kg/Cm2 G |
| 5.1 - 21.0 Kg/Cm2 G | ± 3% |
| 21.1 - 70.0 Kg/Cm2 G | ± 0.70 Kg/Cm2 G |
| > 70.0 Kg/Cm2 G | ± 1% |
Table 2: Leakage rate for valve testing as per API 527
|
Set pressure at 15.6 degrees celsius (60 degrees Fahrenheit)
MPA (psig) |
Orifice diameter < 18mm (0.7 in)
Leakage rate (bubbles/min) |
Orifice diameter > 18mm (0.7 in)
Leakage rate (bubbles/min) |
| 0.013 – 6.896 (15-1000) | 40 | 20 |
| 10.3 (1500) | 60 | 30 |
| 13.8 (2000) | 80 | 40 |
| 17.2 (2500) | 100 | 50 |
| 20.7 (3000) | 100 | 60 |
| 27.6 (4000) | 100 | 80 |
| 34.4 (5000) | 100 | 100 |
| 41.4 (6000) | 100 | 100 |
How often to test a pressure relief valve
API 576 states to test the pressure relief valve as often as needed to maintain the device in a satisfactory operating condition. This means inspecting and testing the valve in accordance with an established schedule for continuously operating valves. The required testing frequency depends on the application. For example, test a pressure relief valve installed in a corrosive and polluted environment more frequently than one installed in a non-corrosive environment. Some conditions that call for shorter testing time intervals include:
- Vibration
- Pulsating loads
- Low differential between set and operating pressure
Also, look at the valve’s testing history over time. Test the valve less often if it consistently passes the test. For new processes where the testing conditions cannot be accurately predicted, perform the initial inspection as soon as possible after the operations begin to establish a suitable and safe testing interval. Test the pressure relief valve after every fire event. Service and replace the valve’s seal gasket if the valve pops open.
FAQs
Is a leaking pressure relief valve dangerous?
Yes, leaking pressure relief valves can cause overpressure conditions leading to system failure and explosions. Diagnose the problem and repair or replace the valve as needed.
How do I fix a leaking pressure relief valve?
Shut down the system, tighten or replace the bonnet bolts, and tighten the packing gland nuts. If the valve still doesn’t work properly, replace the valve.
Why is my pressure relief valve squealing?
Vapor and other compressible fluid passing through the pressure-reducing portion of the valve can cause the fluid’s mechanical energy to convert into sound energy causing squealing.