


Sump Pump Float Switch Replacement
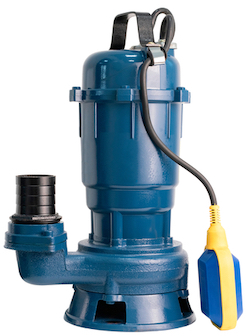
Figure 1: A float switch connected to a sewage pump
It is important to learn how to replace a sump pump float switch, because if it fails it will not dischage the water from the pit causing water levels to rise. The float switch is the component that automatically turns a sump pump on and off with the rise and fall of the water. We've included common troubleshooting methods and the steps needed to replace a sump pump float switch if it occurs.
View our online selection of float switches!
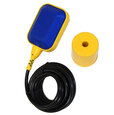
Float switch for sump and sewage pumps
A float switch in a sump pit automatically turns a sump pump on and off. The switch moves up and down with the water level of the pit and rises as the water level rises. When the water level rises to a determined amount, the switch activates and triggers the sump pump to discharge the water from the pit into a dry well or tank. As the water level decreases within the pit, the float switch drops with the water level and switches back to the ‘open’ state, turning off the pump. Read our article on sump pump float switches and sewage pump float switch for more details on the float switch types applicable in sump and sewage pits and how to select them for a particular rating.
Float switch troubleshooting
If a sump or sewage pump fails, always check the float switch before deciding to replace the pump. Often, a sump pump float replacement can resolve the issue without the need for a new pump. A float switch can fail due to multiple reasons.
-
Mechanical wear and tear: Over time, the mechanical components of the float switch, such as the pivot points and internal contacts, can wear out due to repeated cycles of activation and deactivation. This wear can lead to failure in the switch's ability to properly signal the pump.
- Solution: Inspect the float switch for signs of wear and tear. If worn components are found, replace the float switch with a new one.
-
Debris and blockage: Sump and sewage pits often contain debris, sludge, and other materials that can obstruct the movement of the float. If the float becomes stuck or restricted, it may not rise or fall with the water level, leading to improper pump activation.
- Solution: Clean the sump or sewage pit regularly to remove debris and ensure the float can move freely.
-
Corrosion: The harsh environment of a sump or sewage pit can lead to corrosion of the float switch components, especially if they are not made from corrosion-resistant materials. Corrosion can affect the electrical contacts and the structural integrity of the float switch.
- Solution: Inspect the float switch for signs of corrosion. If corrosion is present, replace the float switch with one made from corrosion-resistant materials.
-
Electrical issues: Faulty wiring, loose connections, or damaged cables can cause electrical failures in the float switch. Moisture ingress into the electrical components can also lead to short circuits or other electrical malfunctions.
- Solution: Check all electrical connections and wiring for damage or looseness. Repair or replace any faulty components and ensure all connections are secure and moisture-proof.
-
Insufficient rating: A float switch has a specified rating that indicates the maximum electrical load it can handle. This rating is detailed in the float switch manual, which includes technical specifications such as cable length, maximum operating temperature, and power rating. Using a load that exceeds the float switch's rating can generate excessive heat at the switch contacts, leading to contact welding, insulation breakdown, or complete switch failure.
- Solution: Verify that the float switch is rated for the electrical load it is handling. If the load exceeds the rating, replace the float switch with one that has a higher rating.
-
Improper installation: Incorrect installation, such as improper tether length or incorrect positioning of the float switch, can lead to operational issues. If the float switch is not installed at the correct height or angle, it may not function as intended.
- Solution: Review the installation instructions and ensure the float switch is installed correctly, with the proper tether length and positioning.
-
Power surges: Electrical surges or spikes can damage the internal circuitry of the float switch, leading to failure. This is particularly a concern in areas prone to lightning strikes or unstable power supply.
- Solution: Install surge protection devices to safeguard the float switch and other electrical components from power surges.
How to replace a sump pump float switch
When a sump or sewage pump doesn’t function according to its rated capacity, it is necessary to troubleshoot whether the issue is with the pump or the float switch. For this, unplug the pump from the switch and plug it in separately. If the pump works well, the float switch is bad. Replace the sump pump float switch by following these steps:
Preparation
The first step is to remove the sump cover. Depending on the specific setup, one may need to carefully cut and remove any seal if present. Also, unscrew any bolts or fasteners securing the cover. Unplug the sump pump from the power outlet and disconnect the discharge pipe using an adjustable wrench.
Remove the old float switch
The float switch is typically connected to the pump via a flexible cable. If the float switch is attached with zip ties or clamps, use a screwdriver to remove them and carefully disconnect the float switch from the pump. Note the wiring connections for reference. Carefully lift the sump pump out of the sump pit and place it on a stable surface.
At this stage, temporarily bypass the float switch by plugging the sump pump directly into the power outlet. This will allow the pump to cycle and lower the water level.
Install the new float switch
- Position the new float switch: Insert the new float switch through the sump basket. Use zip ties to secure it to the discharge pipe. Ensure the float switch has enough clearance to move freely without hitting the sides of the tank.
- Adjust the height: Set the float switch at the desired height. This will determine when the pump activates. Additionally, consider the tether length or pivot point of the float switch, as this will influence the range of motion and the water level at which the switch activates. A longer tether allows for a greater range of water levels before activation, which can be useful in larger sumps or basins, while a shorter tether provides more precise control in smaller areas.
Figure 2: Pump start (A and A1) and stop positions (B and B1). Shorten the tether length to decrease the pumping range (left) and lengthen the tether length to increase the pumping range (right).
-
Counterweight installation (if applicable): If the float switch package includes a counterweight, follow these steps:
- Insert the cable: Insert the float switch cable into the conic part of the counterweight, turning it. This action will detach the plastic ring inserted in the mouth of the counterweight. A screwdriver may be used if necessary to help detach the ring.
- Position the ring: Place the detached ring at the desired point on the cable where the counterweight is to be fixed. This position will determine the stability and operation of the float switch.
- Attach the counterweight: Fix the counterweight onto the ring by applying moderate pressure and turning it. Ensure it is securely attached to maintain the correct position of the float switch.
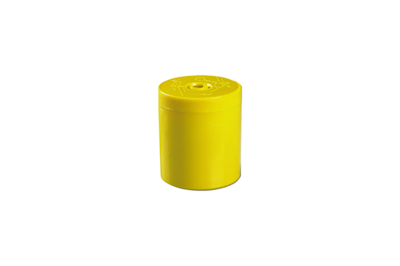
Figure 3: Counterweight for Mac3 float switch
Wiring
Wire the float switch using the wiring diagrams in the user manual.
Reassemble the sump system
Place the sump pump back into the sump pit, reconnecting the discharge pipe securely and plugging the sump pump back into the power outlet.
Testing and final checks
Plug in the new float switch and test the sump pump to ensure it activates at the correct water level. Check for any leaks or issues, and seal the sump cover after the process. Restore power to the sump pump and fill the sump pit with water to test the new float switch. Ensure the pump activates and deactivates at the correct water levels. Having a backup water alarm provides additional security by alerting potential water level issues, ensuring timely intervention to prevent flooding or damage.
Piggyback float switch
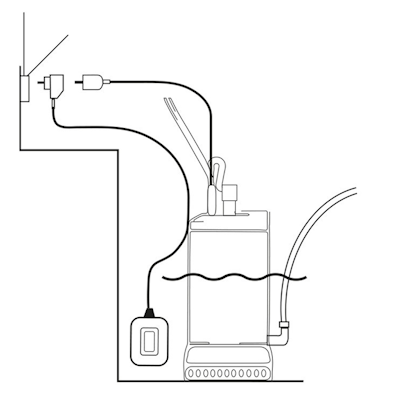
Figure 4: Using a piggyback plug to connect the MAC3/MAC5 float switch's plug to a standard power outlet.
Adding a new external float switch with a piggyback plug can bypass the existing float switch. This method is easier than replacing the sump pump float switch. A piggyback float switch connects the float switch’s plug to a standard power outlet. A piggyback plug has prongs on one side and an additional outlet on the other. A piggyback connector allows the user to unplug the cords from the wall, separate them, and plug the pump directly into the outlet without the switch, thereby allowing it to test the pump by itself.
- Run the sump pump continuously to drain all the water from the pit. Then, disconnect the power.
- Bypass the circuit on the original float switch. Use silicone sealant to seal the housing thoroughly.
- Attach the replacement float switch to the pump housing with a zip tie. Plug the switch into the outlet and plug the bypass plug into the switch.
- Fill the pit with water. Adjust the attachment point on the new switch so that the pump turns on at the correct water level.
- Tighten the zip tie to secure the new float switch.
FAQs
How do you test a sump pump float switch?
Fill the sump pit with water slowly. The float switch should turn on the sump pump to drain the water as the water rises. If this happens, the sump pump float switch is in good condition.
How to fix a sump pump float?
To fix a sump pump float, clear any debris blocking its movement, ensure it's properly tethered, and check for physical damage. If issues persist, replace the float switch.
How do you clean a sump pump float switch?
To clean a sump pump float switch, unplug the pump, remove debris around the float, wipe it with a damp cloth, and ensure it moves freely. Reassemble and test.
What causes a sump pump float to remain stuck?
The common reasons for a stuck sump pump float switch are blockages and dirt buildup within the basin.
What does a float switch do in a septic tank system?
When the sewage in the septic tank rises to a certain level, the float switch activates the sewage pump to drain out the waste.
