


RV Water Pump Check Valve Replacement
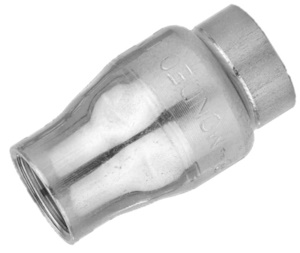
Figure 1: Check valve for an RV
Check valves in RVs (recreational vehicles) are vital for controlling water flow, but they can fail due to various factors. Early failure detection prevents water supply disruption, leakage, or contamination. Knowledge of troubleshooting, repairing, or replacing check valves and regular maintenance, allows RV owners to manage water system issues efficiently, extending its lifespan and saving on costs. Read our RV water pump check valve article for more information on the different check valve types used in an RV.
Table of contents
View our online selection of check valves!
RV plumbing system
Figure 2 shows a basic RV plumbing system. The design can vary from one RV to the other, so always refer to the RV's manual for more information about its pump, valves, and water source setup.
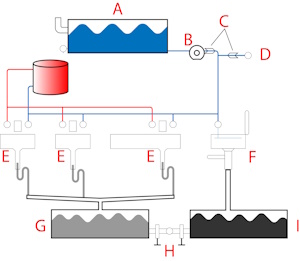
Figure 2: RV plumbing system: fresh water tank (A), water pump (B), pump and city water inlet check valves (C), city water inlet (D), sink/shower (E), toilet (F), grey water tank (G), dump valves (H), and black water tank (I).
- Fresh water tank (A): A large freshwater tank holds the water to use when not connected to a municipal water system. This could be for drinking, cooking, washing dishes, or flushing the toilet.
- Water pump (B): The pump is usually a 12-volt device that operates whenever the pressure in the system drops, such as turning on a faucet or flushing the toilet. It pulls water from the freshwater tank and pushes it through the pipes to the desired location.
- Pump and city water inlet check valves (C): A check valve in an RV plumbing system is a one-way valve that allows water to flow in one direction but not in reverse. The check valve keeps the pumped water from flowing back into the tank. It is typically located on the outlet side of the water pump. Certain water pumps come with an inbuilt check valve.
- City water inlet (D): When connected to city water, the water bypasses the RV's fresh water tank and pump and goes directly to the faucets and toilet. A pressure regulator is typically used in this connection to prevent the high pressure from damaging your RV's plumbing system.
- Sink/shower (E): Water used in sinks and the shower flows to the grey water tank.
- Toilet (F): Water used in the toilet flows to the black water tank.
- Grey water tank (G): Grey water tank for sink and shower drains.
- Dump valves (H): Dump valves in RV water systems are gate valves that release and dispose of waste and grey water stored in the RV's holding tanks.
- Black water tank (I): Black water tank for toilet drainage.
In short, when connected to city water, the pump draws fresh water from the tank into the system when the user turns on a faucet. The check valve keeps the water from flowing back into the tank. When connected to a city water supply, the water bypasses the tank and pump and flows directly into your plumbing system.
Signs of a faulty check valve
A check valve can get stuck for various reasons, such as debris, corrosion, or a malfunctioning spring. Here are some common symptoms that might indicate a problem with the check valve:
- Leaking water: Water leaking from the pump or city water inlet indicates that the check valve isn't closing properly. This is often the most visible sign of a faulty valve.
- Decreased water pressure: A damaged check valve may cause a decrease in water pressure. If the faucets aren't running as strongly as they used to, the check valve might be faulty.
- Pump runs continuously: If the water pump is constantly running, it could mean that the check valve is not holding pressure, causing the pump to work harder. An overworking pump can eventually fail, requiring a costly replacement. It can also drain the RV's battery quickly.
- Unusual noises: Noises like a thunking or clicking sound from the pump indicate that the check valve fails to open or close correctly. This can lead to a complete system failure.
- Backflow of water: A properly functioning check valve prevents water from flowing back into the system. If there is water backflow, it's likely due to a faulty check valve.
- Water contamination: A faulty check valve sometimes allows contaminants to enter the water system. Changes in the water quality could be due to a faulty check valve.
- Rapid cycling of the pump: If the pump turns on and off rapidly (a situation often referred to as 'short cycling'), this can be a sign of a faulty check valve. Short cycling can eventually reduce the pump lifespan.
Troubleshooting
The primary steps in troubleshooting a faulty check valve are to detect the faulty valve and inspect it for possible failures.
Detecting a faulty check valve
- Connect the RV to a city water source and turn on the water.
- The check valve at the city water inlet is likely defective if water leaks from the city water inlet or there is a decreased water pressure.
- Turn on the pump to test the check valve at the water pump. The check valve is faulty if the pump continuously runs or makes unusual noises.
Temporary fixes/Repair
Though replacing the check valve is the best solution, there are a few temporary fixes to try when immediate replacement isn't possible.
- Use a male plug on the city water inlet: Plug the city water inlet with a male end plug. This will stop water from flowing back into the water supply when the pump is turned on. It's a simple and cost-effective temporary solution. Ensure to remove the plug before connecting to city water again.
-
Inspecting valve parts: Unscrew the check valve and visually inspect the parts. Look for any signs of damage, such as cracks, wear, or debris blocking the valve.
- Valve body: This is the outer part of the valve. Look for any cracks or damage here.
- Disc: The disc moves to open or close the valve. It should move freely without any obstructions.
-
Spring: Some check valves have a spring that helps the disc move. Ensure it is intact and sufficiently compressed. Using an appropriate tool (such as a flathead screwdriver), gently depress the spring inside the check valve. This can help release debris or obstructions that might prevent the valve from closing properly. Release the spring slowly to allow any trapped air or debris to escape.
- Note: Do not apply too much pressure, which may further damage the valve.
- Seat: The disc rests on the seat when the valve is closed. Check if it's worn out or damaged.
FAQs
Where are RV check valves?
RV check valves are usually located outside the water pump and next to the city water supply.
What is the purpose of having a check valve in an RV for city water?
The check valve in an RV for city water prevents backflow, ensuring a consistent water supply and protecting the water system from potential contamination.
Do I need a check valve on my water pump?
Yes, a check valve on a water pump prevents water from flowing back into the pump when it's off, maintaining pressure in the system and ensuring a consistent water supply when needed.
Why does an RV city water check valve get stuck?
An RV city water check valve can get stuck for several reasons, including debris or mineral buildup, corrosion, or wear and tear. Improper installation or a faulty spring mechanism can cause the valve to stick.

