How To Repair a Solenoid Valve With a Revision Kit
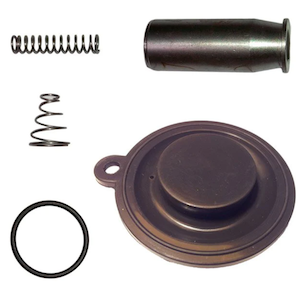
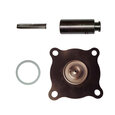
Figure 1: Solenoid valve revision set containing plunger, core spring, seal, seal spring, and o-ring
Solenoid valve revision sets are specially designed maintenance kits with replacement components for common failure points in solenoid valves. These sets typically contain plungers, seals, o-rings, springs, membranes, and related items required to restore proper valve functionality. Revision sets eliminate the need for complete valve replacements, saving time and costs for sourcing and installing new valves. This article explores the process of repairing a solenoid valve with a revision set. Read our solenoid valve types article to understand the construction, working, and types of solenoid valves.
How to repair a solenoid valve with a revision set
- Power isolation and fluid shutdown: Before any repair, disconnect the power supply to the solenoid valve and shut off the fluid flow to prevent accidental activation or leakage.
- Disassemble the solenoid valve: Follow the manufacturer's instructions to disassemble the solenoid valve carefully, removing the coil, housing, and any retaining screws or bolts.
- Component identification: Inspect the valve's components, like the plunger, seal, o-ring, or membrane, to identify the faulty parts that require replacement. Look for damage, wear, or misalignment. Read our article on solenoid valve maintenance for more details on inspecting internal parts and deciding between repairs or replacement.
-
Revision Set Selection: Revision sets are typically chosen either during valve repair or by identifying parts prone to wear or failure, ordering the set in advance of planned maintenance.
- Revision Kit Parts: Verify that the revision set includes the necessary replacement parts for the identified faulty component(s). Ensure compatibility with the solenoid valve in terms of specifications, dimensions, and materials. For instance, if the set contains a seal, confirm that the seal material aligns with the media and check the valve bore range to ensure a proper fit on the specific solenoid valve.
- Kit Variations: Depending on the manufacturer and model, various revisions sets may be available for a specific solenoid valve. Identify the required components and select a kit that contains them.
- Compliance and Certification: Certain industries or applications mandate specific compliance or certifications for solenoid valve revision sets. For example, valves used in food processing or medical applications may need to comply with specific sanitary or safety standards.
-
Component replacement: Replace the faulty component(s) using the corresponding part(s) from the revision set.
- Inspect the solenoid coil assembly to access the core spring. Replace the spring if it is deformed, corroded, or broken.
- Remove the valve cover to access the diaphragm assembly. Check the diaphragm for tears, punctures, or wear marks, and replace it if necessary.
- Disassemble the valve to access the seals and o-rings. Examine each seal and o-ring for cracks, distortion, or wear and replace if needed. Inspect other components like gaskets, springs, and washers for damage.
- Replace any damaged components with the corresponding parts from the revision set.
- Reassembly and testing: Carefully reassemble the solenoid valve, following the manufacturer's instructions and ensuring all components are properly aligned and tightened. Confirm the parts are correctly installed before switching on the power. Read our article on installation for more information.
- Testing and validation: Restore the power supply and fluid flow (if applicable), and conduct comprehensive testing to verify the repaired solenoid valve's functionality. Check for proper opening and closing, reliable sealing, and responsiveness to the electrical signal. Read our article on testing solenoid valves for more details.
- Proper storage and documentation: Store revision sets in a clean, dry, and controlled environment, following the manufacturer's recommendations. Maintain accurate documentation of revision set usage, repair history, and warranty information for future reference.