


Limit Switch Installation Guide
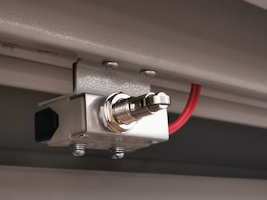
Figure 1: A limit switch installed to operate when a closet door is opened or closed.
Proper limit switch installation ensures the device operates reliably. A limit switch is an electromechanical device that operates based on an object's physical movement or presence. It consists of an actuator mechanically linked to a set of contacts. When an object comes into contact with the actuator, the device reaches a predetermined point, or "limit," causing the contacts to either make or break an electrical connection. This article covers the general installation principles for limit switches, including mounting and wiring. There are many different types and models of limit switches; always read the manufacturer's instructions carefully before installing them.
View our online selection of limit switches!

Limit switch selection
There are various types of limit switches available. Selecting the appropriate limit switch for an application is critical. Evaluating various types, including mechanical, proximity, magnetic, or optical switches, is essential, considering their unique advantages and possible drawbacks. Factors such as mounting position, electrical connections, environmental conditions, and compatibility with other system components (e.g., control valve actuator) must be assessed. Reference the manufacturer's specifications and recommendations to ensure an optimal selection.
Limit switch installation procedure
- Location selection: Choose a mounting location where the switch can be actuated reliably. It should be easily accessible for maintenance and adjustment.
- Mounting the switch: Secure the limit switch to the machine or surface using screws or clamps provided by the manufacturer. Ensure that the switch is stable and will not move out of position.
- Actuator positioning: Adjust the actuator or target to contact the switch's lever or plunger at the desired point in the machine's range of motion.
- Wiring the switch: Wire the limit switch according to the electrical schematic provided for the control system. Ensure all connections are secure and that the wiring is protected from damage.
- Limit switch testing:After installation, test the limit switch to ensure it activates correctly. Confirm that it stops or starts the machinery as intended.
Safety and Maintenance
Keep in mind the following points before, during, and after limit switch installation. Read our article on limit switch maintenance to learn more.
- Safety precautions: Always disconnect power before installing or adjusting limit switches. Follow all safety guidelines provided by the manufacturer.
- Regular inspection: Periodically inspect limit switches for wear, damage, or loose connections. Ensure that actuators have not shifted out of position.
- Cleanliness: Keep the area around limit switches clean to prevent dust or debris from interfering with their operation.
Installation instructions for different types of limit switches
Plunger actuated
- Mount the switch body securely onto a stable surface so that the plunger will be depressed by the machine component's movement.
- Adjust the position of the switch so that the plunger is depressed to the manufacturer's specified distance. Overtravel can damage the switch, while insufficient travel can lead to unreliable switching.
- Test the actuation several times to ensure that the plunger returns to its original position and does not stick.
Lever actuated with roller
- Mount the switch in a position where the roller will be in the path of the moving object. The object should contact the roller smoothly without impacting it from the side.
- Ensure that the lever's angle of actuation is correct; too much leverage can damage the switch, while too little may not actuate it reliably.
- Check for consistent actuation through the full path of the moving object to ensure that there are no misalignment issues.
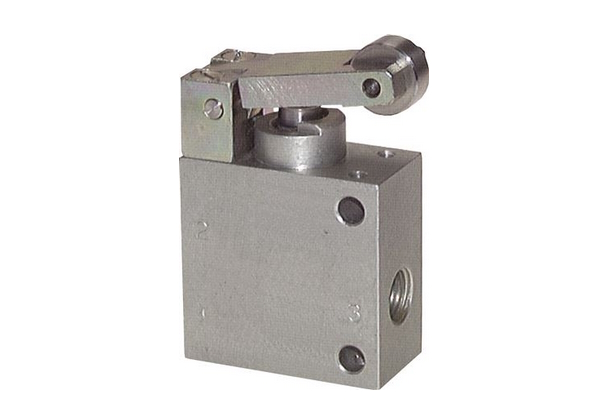
Figure 2: A limit switch actuated by a lever with a roller
Rotary actuated
- Securely attach the switch body to a surface where the lever can be rotated by the moving part.
- Adjust the rotation arc of the lever to match the movement of the machine component. This may involve setting stop points or cams that the lever will contact.
- Confirm that the switch actuates at the desired point in the machine's cycle and that the lever does not rotate beyond the switch's mechanical limits.
Cable-pull
- Install the switch at one end of the area to be monitored and anchor the cable at the opposite end, ensuring it spans the required distance without sagging excessively.
- Tension the cable according to the manufacturer's instructions. This often involves using a spring or weight mechanism to keep the cable taut.
- Verify that pulling the cable at any point along its length results in actuation of the switch and that the switch resets when the pull is released.
Adjustable rod lever
- Mount the switch so that the adjustable rod will be contacted by the machine component.
- Adjust the length of the rod so that it actuates the switch at the correct point in the machine's motion.
- Check that the rod is secure and that its length does not change unintentionally during operation.
- Periodically re-check the rod's adjustment to ensure consistent operation, as vibration and wear can cause changes over time.

