


Step-by-Step Guide: How to Properly Cap off a Copper Pipe
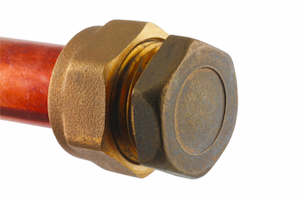
Figure 1: A copper pipe with a copper stop end
A copper pipe cap fits onto the end of a copper pipe to stop the flow of liquids and gasses in that direction. These caps are typically used during renovation and construction projects or when copper pipes in vacant properties must be blocked from external systems. The three types of copper end caps used are threaded, push-to-connect, or soldered. This article discusses how to select between these types and the installation process for each type.
Table of contents
View our online selection of fittings!
Reasons to cap a copper pipe
- Temporary closure: Capping a copper pipe during construction or renovation work can prevent unwanted liquid and gas flow before installation is complete.
- Repair or maintenance: Capping a copper pipe can isolate a section of pipe that needs to be repaired or maintained.
- System expansion or modification: Capping off the existing copper piping makes it easier to expand upon.
- Pressure testing: Copper pipe systems are capped off before being pressurized to control the process in search of leaks and weaknesses.
- Preventing contamination: If a copper pipe supplying water or gas needs to be removed from a system temporarily, a cap can prevent contaminants from getting into the pipe in the meantime.
- Regulation compliance: Building codes and other regulations may require end caps to be placed on copper pipe ends that are not in use or are abandoned. This helps to prevent hazards.
Copper pipe end cap types
There are three general types of end caps for copper pipes: mechanical, push-to-connect, and soldered. Selecting between them comes down to system pressure, cost, permanence, and convenience.
- System pressure: Copper pipe end caps that solder onto the pipe provide the strongest connection and are the best option for high-pressure systems. The operating pressure of typical residential and commercial plumbing systems is low enough for any type of end cap.
- Cost: Mechanical, threaded end caps are the least expensive option, followed by soldered caps, and finally, push-to-connect end caps are the most expensive.
- Permanence: If the end cap will not be permanent, choose either a mechanical or push-to-connect end cap.
- Convenience: Push-to-connect end caps are the most convenient option, whereas soldered end caps are the least convenient.
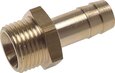
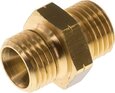
Mechanical pipe end caps
Mechanical end cap fittings are threaded. These fittings can have internal or external threads. The externally threaded fittings are also known as plugs. Mechanical fittings are used specifically with copper pipes with threaded ends and come in various thread design and sizes. This type of end capping is typically done when the pipes are first installed, and an unused port must be blocked. Cutting a working pipe and creating new threads for this connection is too inefficient to make this method suitable over the other methods.
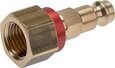
Push-to-connect end caps
Push-to-connect end caps can connect to and seal a copper pipe within seconds without the need for tools. These fittings have teeth that dig into the copper pipe's surface, providing a strong seal. These fittings have a release collar that can be pressed to release the connection and easily remove the fitting.
Soldered end caps
Soldered end caps provide a permanent capping off of copper pipes. The primary benefit of a soldered connection is that it provides the highest pressure rating and is visually appealing on exposed piping when done correctly.
How to cap off a copper pipe
Capping off a threaded pipe end with a mechanical end cap is as simple as selecting a cap with threads that match the pipe's threads and screwing the cap on (or, in the case of a plug, screwing it in). Start by hand tightening and then using a wrench to finish.
Preparing the pipe for cutting
Whether installing a soldered or push-to-connect end cap, follow these steps to prepare the copper pipe for being capped:
- Wear the appropriate personal protective equipment, gloves and safety glasses are a minimum to protect hands and eyes.
- Shut off the water supply to the pipe that will be capped.
- Open a fixture that's connected to the same piping system and is lower in elevation to drain as much liquid from the pipe as possible.
- Mark the position where the copper pipe will be cut using a marker or tape.
Cutting the pipe
Once the pipe is prepared for cutting, choose the best tool to complete the job. An autocut pipe slice works best if there is enough space for this tool to fit around the pipe. It is simple to use and provides a clean cut. If there is no space behind the pipe for this tool, use a hacksaw to make the cut, making sure the cut is square.
Cleaning the pipe end
After cutting the pipe, it is essential to clean the new pipe end before installing a fitting. Not doing so will lead to the installation being compromised and eventually failing. Follow these steps to prevent unnecessary failure:
- Deburr the pipe end's inside and outside to remove all sharp edges.
- Use an emery cloth to further clean the pipe end.
Marking the pipe for fitting installation
Once the pipe end is clean, measure the depth of the end cap fitting and mark on the pipe that distance away from the pipe end to know when the pipe is completely inside the fitting. Failure to fully insert the pipe into the fitting will also lead to unnecessary failure.
Capping off a copper pipe with a push-to-connect fitting
At this point, the work is a few moments away from being finished. Simply insert the copper pipe into the open end of the push-to-connect end cap and push the cap until it meets the mark on the pipe. Pull on the end cap to ensure it is tightly connected and cannot be pulled off.
Capping a copper pipe with a soldered end cap
First and foremost, any soldering job involves open flame and high temperatures and should only be done by those with the necessary skills to complete the work safely. That being said, follow these steps to finish the job:
- Apply flux to the outside of the copper pipe between the mark and the pipe end.
- Apply flux to the inside of the end cap.
- Insert the end cap onto the pipe end, ensuring the pipe end slides fully into the end cap.
- Use a propane torch to heat the joint where the end cap and copper pipe meet. Point the flame away from the end cap.
- Touch the solder to the joint. The solder will melt and flow into the joint. The process is complete when the solder has been applied completely around the joint.
- Allow the joint to cool. Do not disturb the end cap during this process.
- Once cooled, use a clean rag to wipe away excess solder on the outside of the joint.
Testing the connection
After installing a pipe fitting to the end of a copper pipe, it is time to test the connection to ensure the job was done right. Turn the water supply back on and check the end cap for leaks. If there are none, the job is finished.
FAQs
What is a pipe cap?
Pipe caps fit on the end of pipes to stop the flow of liquids and gasses in that direction. They are used during renovation projects and on unused copper pipe ends.
Can I cap a copper pipe without soldering?
Yes, a copper pipe can be capped with a push-to-connect fitting or a mechanical threaded fitting.


