


Manual Pipe Bender
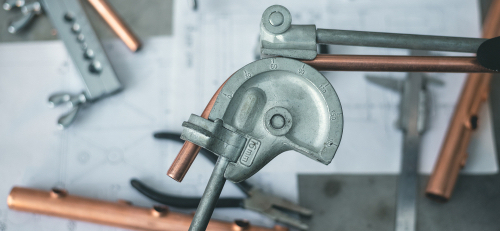
Figure 1: A manual dual pipe bender.
Manual pipe benders are mechanical devices that can provide accurate bends and twists on tubes and pipes. These machines rely on a force applied to their handle to bend copper, stainless steel, cast iron, and aluminum pipes. Manual pipe benders are ideal to use on a worksite without an electricity source. Also, DIY users (do-it-yourself users) with minimal training can operate them with ease. This guide describes the types of manual pipe benders, their design, and operation, applications, advantages, and disadvantages. To learn more about pipe bending, read our pipe bender overview.
Check out our selection of pipe and tube processing tools!
Manual pipe bender types
This section covers the design and operation of some common manual pipe benders:
- Dual pipe bender
- Ergonomic pipe bender
- Mini and micro pipe benders
- Conduit pipe bender
- Ratchet pipe bender
- Free-standing pipe bender
Bending mark on the pipe
Throughout this article, there are references to lining up the mark on the pipe that indicates where the bend begins. This refers to a mark users make on the pipe, likely with a marker. The mark is drawn around the pipe to ensure that it is easy to see, regardless of its orientation.
Dual pipe bender
Due to its ease of use, the dual pipe bender is the most common pipe bender. This bender depends on the user's strength and primarily applies to aluminum, copper, and plastic pipes. However, it can bend steel and cast iron if the user is strong enough.
The key components of a dual pipe bender are shown in Figure 2 and are the following:
- A: Holding clamp
- B: Former
- C: Handle angle markers
- D: Former angle markers
- E: Handles
To bend a pipe using a dual pipe bender, a user follows the following procedure:
- Pull the handles apart to open the bender.
- Place the pipe on the former and hold it in place with the holding clamp. Then close the handles to further support the pipe.
- Ensure that the 0 handle angle mark lines up with the 0 former angle mark.
- Adjust the pipe until the mark that indicates where the bend begins is lined up with the desired angle on the handle angle markers.
- Bend the pipe until the 0 mark on the handle lines up with the desired angle mark on the former.
- Pull the handles apart again to remove the bent pipe from the former.
Note: See below for a brief explanation of the angle markers.
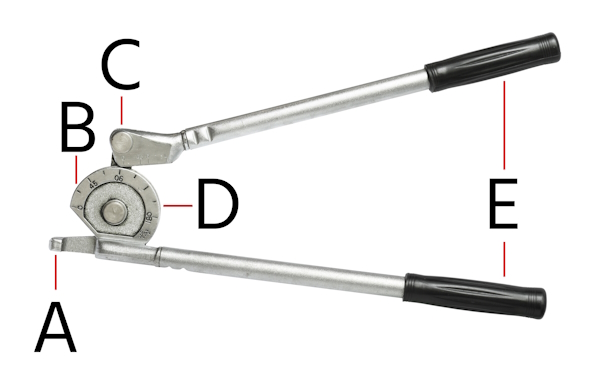
Figure 2: A dual pipe bender: holding clamp (A), former (B), handle angle markers (C), former angle markers (D), and handles (E).
Angle markers
A user determines the angle of the pipe bend by paying attention to the former angle markers. For example, to make a 90° bend, the user bends until the handle's 0 lines up with the former's 90.
The user lines up the bend mark on the pipe with an angle mark on the handle depending on the intended bend. Figure 3 displays common angle marks seen on manual pipe bender handles:
- 0: Before bending, align the 0 mark on the handle (Figure 3 labeled A) with the 0 mark on the former.
- 45: To make a 45° bend, align the mark on the pipe with the 45 mark (Figure 3 labeled B).
- R: To make a bend larger than 90°, align the mark on the pipe with the R mark (Figure 3 labeled C).
- L: To make a 90° bend, align the mark on the pipe with the L mark (Figure 3 labeled D).
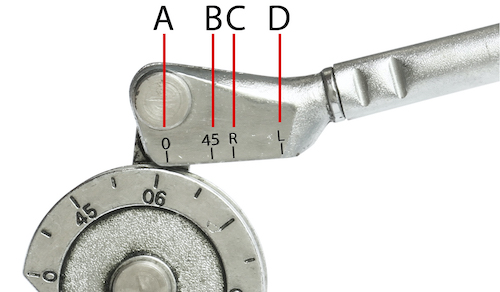
Figure 3: The handle angle markers on a dual pipe bender: 0, which aligns with the 0 on the former (A); 45, for making 45° bends (B); R, for making bends larger than 90° (C); and L, for making 90° bends (D).
Ergonomic pipe bender
An ergonomic pipe bender is similar to a dual pipe bender. The important difference is that the ergonomic pipe bender has longer, curved handles. This design difference allows the user to bend a pipe with less force than is necessary using the dual pipe bender.
Mini and micro pipe benders
Mini and micro pipe benders are for pipes that are too small for dual pipe benders, which are suitable for pipe diameters as small as 10 mm.
- Mini pipe bender: Suitable for 6 - 10 mm diameter pipes.
- Micro pipe bender: Suitable for 3 - 6 mm diameter pipes.
As seen in Figure 4, mini and micro pipe benders, although smaller, have the same basic design as dual pipe benders: former, holding clamp, and angle markers. Therefore, the operation of a mini or micro pipe bender is the same as that of a dual pipe bender.
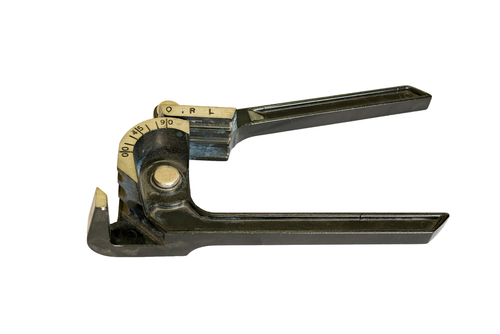
Figure 4: A mini pipe bender.
Conduit pipe bender
Conduit benders are special manual benders that bend conduit, which is piping and tubing that protects cables and wires. The key components of a conduit bender are the handle, former, hook, and heel.
- Handle: Conduit pipe bender handles are 96.5 cm or 111.8 cm long (38 in or 44 in). The longer handle is for bending stronger material, such as steel.
- Former: Conduit pipe bender formers come in varying sizes for EMT and rigid conduit. Learn more about conduit types in our <a href="/pages/electric-pipe-bender">electric pipe bender</a> article.
- Hook: The hook at the end of the former holds the conduit pipe during the bending process.
- Heel: The heel is on the opposite end of the former from the hook. The user presses down on the heel with a foot to assist the bending.
For conduit bending, there are several types of bends. Each bend type has its own preparation procedure. The following instructions outline a general bend procedure:
- If possible, secure the conduit on the floor to prevent slipping.
- Place the former on the conduit so the pipe goes through the hook.
- As seen in Figure 5, press down firmly on the conduit with a foot. Constant, firm pressure is necessary to keep the conduit in the former.
- Use the handle for leverage until the bend is complete.
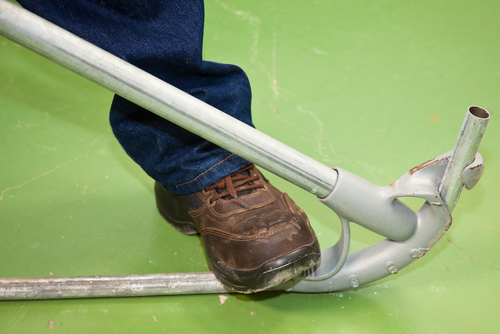
Figure 5: A conduit pipe bender making a 90° bend.
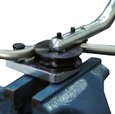
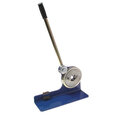
Ratchet pipe bender
Ratchet pipe benders are suitable for making 90° bends in pipes; the pipes can range from 10 to 32 mm in diameter. Similar to hydraulic pipe benders, ratchet pipe benders use the ram bending method. As seen in Figure 6, the former presses into the pipe, which is held in place by two supporting pins. To move the former forward, the user pulls the lever on the bender’s body.
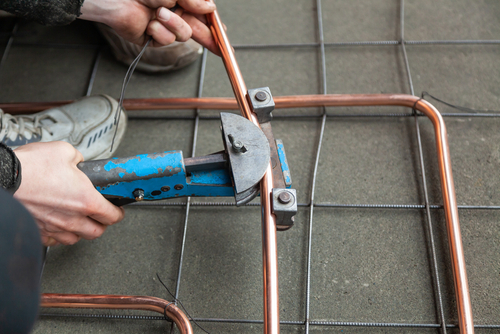
Figure 6: A ratchet bender bending copper pipe.
Free-standing pipe bender
Free-standing pipe benders are much larger than other manual pipe benders. These benders are suitable for bending larger and stronger pipes.
The key components of a free-standing pipe bender are:
- Former: The former comes in different sizes for different pipe diameters.
- Handle: The handle is large. One end of the handle has a roller that bends the pipe. A user can use both hands to pull the handle, providing more strength to bend pipes made of stronger materials.
- Guide: The guide sits above the pipe. It takes the pressure off the pipe so that it does not get crushed during the bend.
- Legs: A free-standing pipe bender has two large legs to support it.
- Extra formers: Free-standing pipe benders come with several formers for bending different pipe sizes.
The following steps describe how to use a free-standing pipe bender.
- Attach the former that matches the pipe size.
- Insert the pipe on top of the former and secure it with the holding clamp.
- Secure the guide between the pipe and the roller on the end of the handle.
- Bend the pipe by pulling the handle down.
- Lift the handle to remove the pipe.
Manual pipe bender uses
Manual pipe bending machines can bend tubes for roll cages, furniture, frames, and more. They are suitable for metals like copper, brass, stainless steel, titanium, aluminum, and carbon steel. Learn more about bending different pipe materials by reading our pipe bender material guide. Many industries use these tools, including:
- Food industry equipment
- Scooter and motorbike accessories
- Exhausts
- Fuel pipes for diesel vehicles
- Home Furnishings
- Handles
- Railways
- Ship, boilers, and bridges constructions
Advantages of manual tube benders
Compared to hydraulic and electric pipe benders, most manual pipe benders are cheap, less bulky, easy to transport, and simpler to operate.
Other reasons to use manual tube benders are:
- Ease of operation
- Simple construction
- Operate without coolants and hydraulics
- Work on mechanical effort
- Lower production costs
- Eliminate the need for electric power
- Ideal for home and DIY tasks
Disadvantages of manual tube benders
The drawbacks to using manual pipe benders are:
- Require more effort to operate than hydraulic or electric units
- Not programmable
- Bends depend on the user’s strength
- Less durable than hydraulic units
- Inability to produce precise angles on large and thick pipes
Read our electric and hydraulic pipe bender articles for more information on each type.
FAQs
What is the difference between a pipe bender and a tube bender?
There is no difference between a pipe and a tube bender. A machine that bends a tube can also bend a pipe except where the sections are too large or too small.
What are the four different types of tube bending?
Pipe bending can be grouped into:
- Compression bending
- Mandrel tube bending
- Roll bending
- Rotary draw bending
What problem is common with pipe bending?
Pipe bending exposes the outside radius to flattening and the inside to wrinkling and buckling. When you use a wiper die, it may stop buckling and wrinkling.
Why use a pipe bender over a bending spring?
A pipe bender has markings that enable the user to make accurate bends, so it's preferable over a bending spring. Another reason is that a bending spring causes knee injury to the user if it's used daily for a prolonged time.