


Pipe Threading: Step-by-Step Guide and Essential Tools
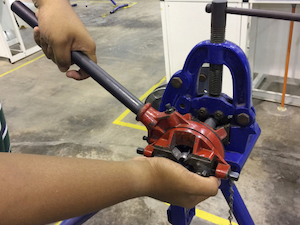
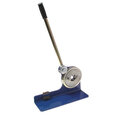
Figure 1: Mechanical pipe threading machine
Pipe threading is fundamental in plumbing and mechanical works, playing a pivotal role in connecting pipes securely and ensuring the smooth flow of fluids. Different tools like mechanical, electric, or handheld threading machines create thread patterns on a pipe. This article is a step-by-step guide on how to thread a pipe.
Table of contents
- Why is threading pipes important
- Essential tools
- How to thread pipes
- Pipe threader machine types
- FAQs
Check out our selection of pipe and tube processing tools!
Why is threading pipes important
Threaded pipes have one end with threads, allowing it to be screwed into a fitting or another threaded pipe, creating an airtight seal. Threads resemble the grooves found on a typical screw and securely hold components together, preventing them from being easily pulled apart.
- Threads enhance the flexibility in connecting pipes, mainly when dealing with different sizes.
- The threads are crafted from durable materials like stainless steel or brass. This ensures their longevity and corrosion resistance.
- The threads are safeguarded against erosion and rust, leading to increased longevity.
Common pipe thread standards are national pipe, metric, and bsp threads.
Essential tools
Before starting the pipe threading process, have the following tools ready:
- Pipe threading machine
- Dies
- Threading oil
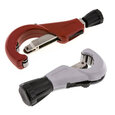
- Pipe cutter
- Pipe reamer
- Pipe wrenches
- Personal protective equipment
How to thread pipes
This section discusses how to thread a pipe using a mechanical threading machine.
1. Determine the pipe material
First, determine the type of pipe, whether it is steel, PVC, or copper. Steel pipes offer greater strength than copper and PVC pipes but can be more challenging to bend due to their lower malleability. Ensure that the area surrounding the pipe is clear of any dirt, dust, loose particles, or obstructions such as debris or burrs.2. Secure the pipes
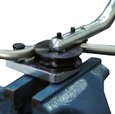
Begin by firmly securing the pipe in a vise. If the pipe's width is less than an inch, utilize the vise's jaws as a clamp. If the vise has two jaws, position them on either side of the pipe and tighten them simultaneously until the pipe is securely held in place without any room for movement. Alternatively, use clamps if they are available and long enough to encircle the pipe without obstruction.
3. Trim and smoothen the pipe
Carefully cut off any excess metal or PVC to adjust the length of the pipe. This ensures a proper fit with the existing pipe. Next, secure both ends of the pipe with a few wraps of bungee cord or rope to minimize movement during the subsequent tightening process.
4. Find the appropriate pipe thread size
Choose the die size for the pipe diameter and threading standard (e.g., NPT or BSPT). To determine the correct pipe thread size, refer to the markings on the die head, which usually indicate the size. Alternatively, read the instructions provided by the manufacturer to determine the right pipe thread size. Read our tap and die set article for more information on how to use a die.
5. Position the pipes
Apply threading oil to the end of the pipe. This helps reduce friction while turning the wrench or die. Place the die head onto the end of the pipe and ensure it is positioned as close to the center as possible, avoiding tilting. The dies are the cutting tools that create the pipe threads. Before starting the threading process, ensure the die is lubricated with oil.
6. Start threading
- Apply downward pressure on the die handle to break off small sections from both ends of the pipe until they reach a length suitable for passing through a hole with a minimum diameter of one inch.
- Switch on the pipe thread machine and ratchet the handle in a clockwise motion while exerting pressure to initiate the cutting process through the pipe wall.
- Ratchet the handle until all teeth of the die are fully engaged with the workpiece. Using a rag or cloth, apply a drop of oil to the center of each tooth. This minimizes friction between the die and the pipe during the cutting process.
- Continue ratcheting the handle until the pipe threader has completely cut through the pipe. This guarantees that every surface of the die head is utilized.
7. Reverse the rotation
Switch the rotation by ratcheting the handle in the opposite direction. Turn it counterclockwise to disengage the teeth of the die head from the threads. Ratchet it as far as it goes in the counterclockwise direction, then reverse the rotation. Once completely unbolted, the die head can be easily removed from the end of the pipe.
8. Secure the connections
It is crucial to properly seal the threaded connections to prevent leaks and protect the pipes from corrosion.
- Use pipe sealant, Teflon tape, or a liquid pipe thread compound for a more reliable seal.
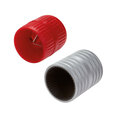
- Use sandpaper to remove any burrs from the surface or scrape them off with tape if they are small enough. This ensures no debris gets trapped between the threaded connections when inserting the pipe into another tubing piece later.
Pipe threader machine types
A pipe threader is a tool designed to create threads on the end of a metal pipe. This helps attach a pipe to a coupling or connector, ensuring a secure and reliable joint.
Mechanical threader
A mechanical thread machine (discussed in the previous section) utilizes a manually operated ratchet mechanism. Rotating the die head and cutting threads into the pipe requires physical effort. This machine type is suitable for softer and lightweight pipe materials, typically up to 2 inches (5.08 cm) in diameter. It is commonly used for small-scale projects or when threading requirements are not frequent or extensive.
Power-operated threader
A power-operated thread machine, also known as an electric or motorized thread machine, is equipped with an electric motor to rotate the die head automatically.
- Significantly reduces physical effort
- Speeds up the threading process
- Capable of threading a wide range of pipe materials, including black, galvanized, plastic-coated, stainless steel, and heavy-wall conduit
- Suitable for heavy-duty and high-volume repetitive work
- Handles larger diameter pipes that are commonly used in industrial settings or professional plumbing applications
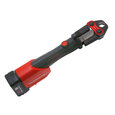
Handheld threader
A handheld thread machine is a portable, electric-powered tool used for threading pipes. It is typically smaller and more lightweight than a power-operated machine. The handheld threader features an automatic die head rotation powered by electricity.
- It provides increased convenience and efficiency compared to a mechanical thread machine.
- Handheld thread machines are suitable for various pipe materials and sizes, offering versatility and ease of use.
- They are commonly used when portability is essential or when threading requirements occur on-site or in tight spaces.
FAQs
What are the essential tools needed for pipe threading?
The essential pipe threading tools include a pipe threading machine, dies of various sizes, cutting oil, pipe cutter or saw, pipe reamer, pipe wrenches, and safety gear like goggles and gloves.
How do I ensure clean and precise threads while threading pipes?
To achieve clean and precise threads, maintain a steady speed and pressure while threading with the machine. Regularly inspect the threads during the process and use cutting oil generously.