


Off-Grid Elevated Water Design
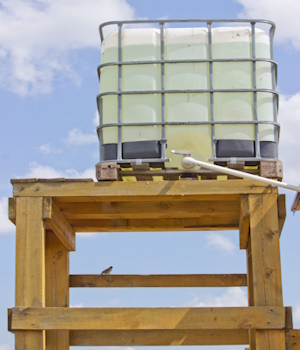
Figure 1: An elevated water tank for an off-grid system
An off-grid water system is a self-contained, independent water supply and distribution system that operates without relying on external utilities, such as municipal water sources or electricity. They are typically used in remote or isolated locations. This article thoroughly explores the layout and working of an off-grid gravity-assisted water system for a cabin by considering a typical example.
Table of contents

Off-grid system
For this article, consider an off-grid system where the water is sourced from a river 60.9 m (200 feet) from the cabin and pumped to a storage tank positioned 4.6m (15 feet) above the cabin. The cabin is at an elevation of 20 feet above the level of the river. This tank utilizes gravity to distribute water to various fixtures, like faucets and toilets, through a network of pipes. Valves are strategically placed to regulate the water flow. The next sections explain each of these components in detail.
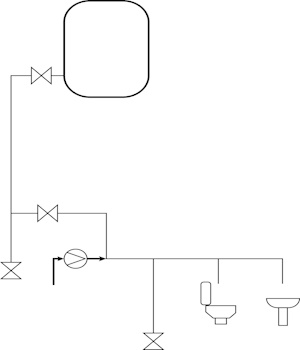
Figure 2: Off-grid elevated water design
Water source
A water source is needed: a well, a spring, a stream, or rainwater collected in a cistern. Normally, water sources are lower in elevation than cabins, so a pump is necessary for water to flow from the source to the tank. Alternatively, water can be carried from a nearby source to fill the storage tank manually. If the water is to be used for drinking, it is important to use pipes, hoses, and valves made from materials safe for drinking water with the necessary certifications. Some common materials that are safe for drinking water include:
- Stainless steel
- Copper
- PVC
- PEX
It is also important to clean the water system regularly to prevent the growth of bacteria. Some common cleaning methods include:
- Flushing the system with clean water
- Using a chlorine bleach solution
- Using a commercial water system cleaner
If the water is only to be used for flushing the toilet and washing hands, then there is no need to use specifically safe materials for drinking water. However, it is still important to use durable materials that are resistant to corrosion and leaks. Some common materials that are suitable for non-potable water include:
- PVC
- ABS
- Galvanized steel
Pump
A pump moves water from the source to the storage tank. This is the only part of the system that requires energy. Depending on the availability and efficiency, a hand pump, a solar pump, a windmill pump, or an engine-driven pump can be used. It is important to use a strainer on the suction hose of a water pump to prevent debris from entering the pump. This can damage the pump and reduce its lifespan.
Pump sizing and selection
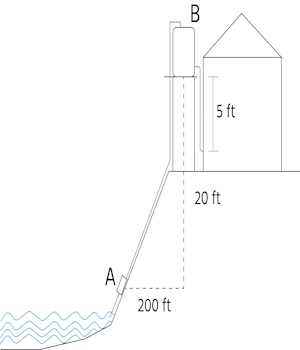
Figure 3: The pump (A), cabin, and storage tank (B) setup
- Calculate the total dynamic head (TDH): TDH is the total resistance the pump must overcome. It includes the elevation difference between the pump and the delivery point, the friction loss in the pipe, and the suction head.
- Elevation head: In the above example, the water storage tank is approximately 15 feet above the cabin, which is at an elevation of 20 ft from the water source; so the elevation head is 35 ft.
- Friction loss: Friction loss quantifies the resistance to flow and the frictional losses that occur when water flows through a conduit like a pipe or hose. This depends on the size and length of the hose and the flow rate. For example, consider a 1" diameter hose with a friction loss of approximately 4 ft per 100 ft at a flow rate of approximately 18.93 liters per minute (5 gallons per minute) (which is typical for domestic use). So, the friction loss for a pipe length of around 200 feet is (60.96/30.48) * 1.22 = approximately 8 ft
Note: To calculate the exact friction loss, determine the hypotenuse of the triangle formed by the horizontal distance from the pump to the cabin (200 ft) and the elevation of tank from the pump (35 ft); this gives the exact hose length that carries pumped water. Also, the friction loss is typically small compared to the sum of the elevation head and suction head.
- Suction head: The suction head is the vertical distance between the water level in the river and the center of the pump's inlet. It determines the maximum height to which the pump can lift water. In this example, the suction head is 5 feet.
The pump must have a suction head of at least 5 feet to lift the water from the river to the storage tank without cavitating. Cavitating refers to the formation of vapor-filled cavities or bubbles in a liquid, such as water, due to a decrease in pressure, which can occur in a pump when the suction head is insufficient, potentially causing damage and reducing efficiency.
So, the TDH = Elevation head + Friction loss + Suction head = 35 ft + 8 ft+ 5 ft = approximately 48 ft.
- Select the pump: Choose a pump that can deliver the required flow rate at the calculated TDH. Pump manufacturers provide performance curves for their pumps, showing the flow rate at different heads. Find a pump that can provide the application's necessary suction head, elevation head, and flow rate. Choose a pump with a higher power if filling the tank fast is a priority. Figure 4 shows an example pump curve. For a system with 48 feet total dynamic head and a required flow rate of 5 gallons per minute, the user can select pump B (Usually the curves will have their corresponding power ratings next to them, like 0.5HP or ¾ HP).
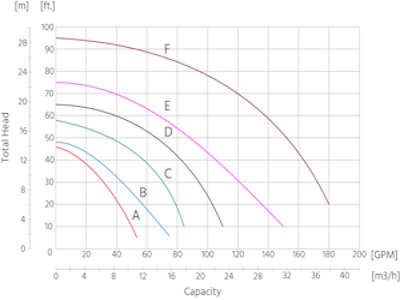
Figure 4: Example pump curve
Hoses
Hoses transport water from the source to the pump and from the pump to the elevated tank. The hoses should have a sufficient pressure rating to handle the pump's output. Reinforced PVC or rubber hoses would be adequate for the example application, offering a durable and more permanent solution instead of a scenario where individuals must assemble their equipment each time they want to pump water. Many users opt for a system where they store the pump and hose, and when the need for water arises, they simply retrieve, connect, pump, and then store the equipment. This practical approach highlights the importance of a reliable hose, such as a lay-flat hose, which can significantly streamline the process, making it more efficient and convenient for accessing water resources. A 1" diameter hose is generally rated for about 9-12 gpm, so it would be a suitable choice for this application.
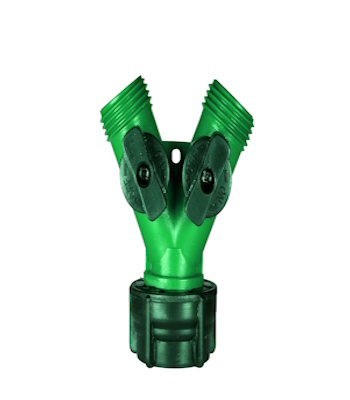
Figure 5: A Y-shaped garden hose connector for multiple hoses
Storage tank
The water tank should be elevated higher than the point of use. The force of gravity pulls the water downward, creating water pressure. The height of the tank determines the pressure of the water; the higher the tank, the higher the pressure. The tank should be able to hold enough water to meet all needs, and it should also be covered and sealed to prevent contamination. Consider the weather when deciding whether to place the tank inside or outside. In cold weather, placing the tank indoors can prevent the water from freezing, which could damage the tank. However, an outdoor tank might be more convenient in mild weather and save indoor space. The tank can be square or round.
- Square tanks are compact and easy to move. However, they may not have the inherent structural strength of round tanks due to their flat walls. Adding a metal cage provides structural support and prevents the tank from collapsing or deforming when filled.
- Round tanks take up more horizontal space.
It's a good idea to have a way for extra water to escape if the tank gets too full when pumping it full of water. This will stop it from bursting or flooding your cabin if the tank is inside. Consider having a ball valve towards the top of hte tank that can be opened during pumping it full of water and closed when the filling is complete.
Vacuum in storage tank
Using water from a sealed tank will create a vacuum in the tank. As the water flows out, the air inside the tank expands to fill the empty space. This reduces the pressure inside the tank, creating a vacuum.
The amount of vacuum created will depend on a few factors, including the size of the tank, the rate at which the water is being used, and the temperature of the water. If the tank is large and the water is being used slowly, the vacuum will be less than if the tank is small and the water is being used quickly. Additionally, the warmer the water, the more it will expand, creating a greater vacuum.
Here are some tips to reduce the vacuum created in your water tank:
- Fill the tank slowly.
- Install a vacuum breaker or pressure relief valve.
- Avoid using too much water at once.
Pipes
Purpose and types
The storage tank is connected to the fixtures by pipes. The height difference between the tank and the point of use creates water pressure in these pipes. Gravity pulls the water down and forces it through the pipes, faucet, and toilet when opened.
- PEX (Cross-Linked Polyethylene) pipes: PEX pipes are flexible, easy to install, resistant to scale and chlorine, and suitable for hot and cold water. Also, they don't need soldering like copper. However, they are unsuitable for outdoor use as they can degrade under UV light.
- Copper pipes: Copper pipes are highly durable, resistant to corrosion, and can withstand cold and hot temperatures. They're often used in high-end construction or renovation. However, they are more costly and require soldering skills to install.
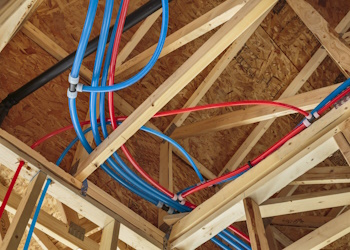
Figure 6: PEX pipes
Design
Running water lines involves careful planning to ensure optimal system performance and easy maintenance. Here are some important considerations:
- Building design: The layout significantly influences how and where the water lines run. It's essential to thoroughly understand the building's design, including where the fixtures and appliances needing water are located.
- Insulation: Insulate the pipes to protect against freezing and heat loss. This is crucial for off-grid homes, which may not maintain a consistent internal temperature. Insulation materials include foam insulation tubes or heating cables for extreme cold climates.
- Pathway: The pathway of the lines should avoid electrical wiring, heating ducts, and areas where they can be damaged, such as doorways or high-traffic areas.
- Through-wall: To run water lines in the walls, drill holes through the studs and thread the pipes. Use escutcheon plates to prevent drilling into the pipe. Horizontal pipes should run lower than the supply and drain stub-outs to allow for a downward slope.
- In ceilings: Running lines in ceilings is less common, mainly due to the potential damage if a leak occurs. However, it may be necessary in multi-story buildings.
Note: Flexible hoses may be more practical in some situations, especially if the utility units need to be moved. These hoses need to be safe for drinking water if they are used for potable water. Braided stainless steel hoses are commonly used for this purpose for their durability and safety.
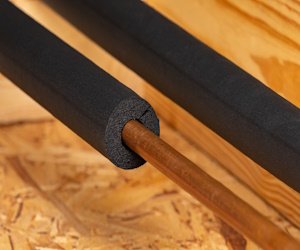
Figure 7: Water pipe with insulation
Sizing
Consider the flow rate and pressure for the pipes transferring water from the tank to the fixtures. Larger pipes may be needed to handle the combined flow rate if multiple fixtures could be used simultaneously. However, a 1/2" pipe could serve each fixture well as it typically can handle a flow rate of 1.5 gpm, which is sufficient for most fixtures.
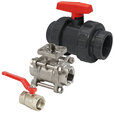
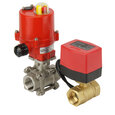
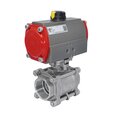
Valves
Valves are used in a gravity-fed water system to control water flow, isolate system sections for maintenance and prevent backflow.
- Check valves: A check valve (a non-return valve) is often placed at the pump outlet. It allows water to flow only in one direction towards the storage tank. When the pump is turned off, it prevents water from flowing back into the well or water source. In some cases, the pump can have an in-built check valve.
- At the storage tank: Two valves are often used here. A shut-off valve (like a ball valve) at the inlet lets the user stop the water flow into the tank, which is useful when cleaning or repairing the tank.
- At the tank outlet: Another shut-off valve can be placed at the tank outlet. This prevents water flow from the tank into the pipes when repairing or replacing pipe system parts.
- At each point of use: Separate shut-off valves are often installed at each point (e.g., under each sink, behind the toilet, at the water heater, etc.). These allow stopping water flow to individual fixtures without affecting the rest of the system.
- Drain valves:Drain valves are placed at the lowest points in the system, like the bottom of the tank, or at low points in the pipework for draining the system for maintenance or winterizing (discussed later).
Each valve should be compatible with water and sized appropriately to accommodate its flow rate and pressure (discussed later).
Connecting fixtures
Water heating system
In an off-grid plumbing system, a hot water line is typically connected to a water heating system such as a solar water heater, propane heater, or a wood-burning stove with a water heating attachment. The heated water is then distributed through the hot water line to various outlets in the system, such as showers, sinks, and washing machines. The hot water line should be properly insulated to prevent heat loss during transportation.
Faucets
There are two primary faucet options:
- Standard faucet: Many standard faucets have a flow rate of 2.2 gallons per minute (GPM) or more. Standard faucets don't usually come with features that reduce water usage, such as aerators or flow restrictors, which break the flowing water into fine droplets, thus reducing the amount of water used without compromising performance.
- Low-pressure faucets: These are designed to limit the amount of water that flows out, making them more water-efficient than standard faucets. They're ideal for off-grid systems where water conservation is a priority. Low-flow faucets typically have a flow rate of 1.5 GPM or even less. This means much less water is used with a low-pressure faucet, even for simple tasks such as washing hands or rinsing dishes.
Filtration
Depending on the quality of the water source, a filtration or purification system may be needed to ensure the water is safe for drinking and other uses. This could be a simple screen filter to remove sediment and debris or a more complex system to remove bacteria, viruses, and other contaminants. Filters are typically installed at the following locations:
- After the pump but before the storage tank
- Before the pump on suction hose
- A secondary point-of-use filter at the faucet for drinking water
A basic sediment filter may suffice if the water is relatively clean and needs to be sediment-free. However, If the source water contains bacteria or other microorganisms, use a UV filter or a reverse osmosis system.
Winterizing
Winterizing off-grid water system pipes is crucial to prevent them from freezing and potentially bursting, which could lead to costly repairs. One practical way to prevent/slow down freezing is to cover the tank in heavy-duty black landscape fabric. Here's a step-by-step guide on how to winterize an off-grid plumbing system:
- Turn off the water supply: Turn off the water supply (by closing the storage tank inlet valve) to prevent any more water from entering the system.
- Drain the system: Open the drain valve(s) to let water out of the pipes. Also, open all the faucets to help the system drain completely.
- Use air to blow out remaining water: Once most of the water has been drained, use an air compressor to blow out any remaining water that could freeze. Connect the air compressor to the system (at a faucet or the drain valve), and apply low pressure to push out the remaining water. Ensure to open each faucet one at a time until all the water has been blown out.
- Add antifreeze: Add non-toxic plumbing antifreeze to the system for extra protection. Pour the antifreeze into all drains, toilets, and appliances. This will prevent any remaining water from freezing. Non-toxic plumbing antifreeze is designed to be safe for the plumbing system and is typically biodegradable. It remains in the pipes and drains until it is gradually flushed out by regular water usage once the weather warms up.
- Insulate pipes: Insulating the pipes can help prevent them from freezing. Use pipe insulation or heat tape on any pipes exposed to the cold.
- Shut off valves: Finally, close all the valves and faucets in your system. This includes the shut-off valves at each point of use and the main outlet valve at the storage tank.
Pressure drop
Determining the pressure loss from an elevated tank is crucial to ensure the water flow rate is sufficient for the system's needs and to prevent damage to plumbing fixtures and appliances caused by excessive pressure.
Static pressure
The pressure in an elevated water tank can be determined using the formula:
P = ρgh
- P: Fluid pressure
- ρ: Fluid density
- g: Acceleration due to gravity
- h: Height of the fluid column above the point in question
In this case, the fluid is water, so the density ρ is approximately 1000 kg/m^3. The acceleration due to gravity g is about 9.81 m/s2. The height h is 4.57 m (15 feet).
So, P = 1000 kg/m^3 * 9.81 m/s^2 * 4.57 m = 44.77 kPa (6.5 psi)
This is the pressure at the bottom of the tank or at an outlet at ground level. If the outlet is higher, use the height of the water column above that outlet.
Pressure drop
When water flows, the effective pressure will reduce due to losses from friction and other factors. The pressure drop is typically calculated using the Darcy-Weisbach equation:

- ΔP: Pressure drop
- f: Darcy friction factor
- L: Pipe length
- V: Flow velocity
- D: Pipe diameter
- 𝝆: Fluid density
The Darcy friction factor is primarily determined by the flow type (laminar or turbulent) and the roughness of the pipe's internal surface. It can be obtained using lookup tables, correlations, or software from experimental data. Apply the equation to each pipe section and fitting to calculate the pressure loss at each outlet.
Consider calculating the pressure loss at a sink. Assume a friction factor (f) of 0.02 (typical for smooth pipes) and a velocity (v) of 1 m/s (typical for domestic water supply).
ΔP = 0.02 * (10m / 0.025m) * (1000 kg/m³ * (1 m/s)² / 2) = 16000 Pa (2.32 psi). This is the pressure loss due to friction in the pipe.
The actual pressure at the outlet when the water is flowing will be the static pressure minus the dynamic pressure:
P_outlet = P - ΔP = 44817.7 Pa - 16000 Pa = 28817.7 Pa (4.17 psi)
Note:
- Use a pressure gauge at the outlet for the most accurate pressure readings. This will give real-time pressure readings that can be compared with the calculations to ensure accuracy.
- This is a simplified example; conditions may vary based on pipe bends, valves, fittings, etc. Also, the friction factor and flow velocity typically need to be calculated based on more detailed information about the pipe and flow conditions. Start by understanding the basics of resistance in your water system. Gather relevant information, research pipe sizing, and calculate flow velocity to get an initial grasp of the issue.
FAQs
What are the options for off-grid water supply?
Depending on the location and available resources, off-grid water supply options include rainwater harvesting, well water, surface water from streams or ponds, and trucked-in water delivery.
How do I get hot water off the grid?
To get hot water off the grid, consider options like solar water heaters, tankless propane or gas water heaters, or wood-burning water heaters, depending on your energy source and preferences.
How do you run plumbing off the grid?
Source water from wells, springs, or rainwater, store it in tanks, use pumps powered by renewable energy, distribute water through pipes to fixtures and consider waste management options.


