


Globe Valve Installation & Repair
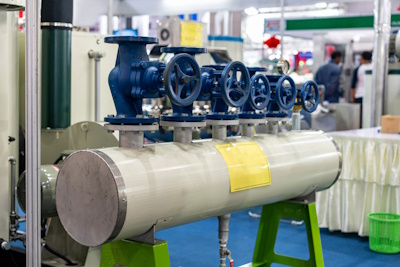
Figure 1: Globe valves installed for fluid control in an industry
Proper installation and maintenance of globe valves are critical to ensure their long-term performance and reliability. Globe valves regulate fluid flow in industrial and commercial applications, such as power plants, chemical processing plants, and water treatment facilities. This article will discuss the key steps involved in globe valve installation, repairs, and the importance of regular maintenance.
Table of contents
View our online selection of globe valves!
Globe valve installation
Proper alignment, torque settings, and sealing integrity are vital to prevent leaks and ensure efficient flow control in globe valves. Additionally, ensuring the valve is adequately supported and positioned in a way that allows for easy access for maintenance and operation is essential.
-
Inspect the valve:
- Ensure the globe valve is in good condition with no visible cracks, dents, or other damage, especially on the disc and seat that are the two most crucial sealing surfaces. If the disc or seat is damaged, the valve will not seal properly and may leak.
- The valve stem should be smooth and free of corrosion. Inspect the packing for any signs of wear or damage. The packing is a seal that prevents leakage from the valve stem.
- Ensure the valve's end connections match the piping's end connections. If the globe valve has flanged end connections, ensure the bolts and nuts are tight and secure. Learn more in our flanged valves vs threaded valves article.
- Choose the right location: Globe valves should be installed where they are accessible and can be operated easily. There should be enough clearance around the valve for easy operation and maintenance.
-
Determine the flow direction: Globe valves are directional valves, so installing them in the correct direction is crucial. The flow arrow on the globe valve body will indicate the correct flow direction. Globe valves can be installed in a horizontal or vertical orientation. Still, the vertical orientation is preferred because it helps prevent debris from accumulating in the valve's bonnet. If a globe valve must be installed horizontally, it must be installed with the stem in the upright position. This helps to prevent the stem from binding and will make it easier to operate the valve.
- If the valve is to be used in a throttling application, install it with the flow under the disc. This will help extend the valve's life and reduce the risk of cavitation.
- If the valve is used in a high-pressure or high-temperature application, install it with the flow under the disc. This will help to improve the sealing performance of the valve.
- If the valve is to be installed in a piping system with multiple valves, ensure all valves are installed in the same direction. This will help to prevent turbulence and cavitation in the piping system.
-
Connect the valve to the piping: Ensure the valve is fully closed before installing it in the piping.Use appropriate pipe fittings and sealant to connect the valve to the piping. Make sure the connections are tight and leak-free.
- Apply a generous amount of sealant to the threads of the pipe fittings. This will help to create a watertight seal.
- Connect the valve to the piping. Screw the pipe fittings onto the valve and piping until they are snug.
- Tighten the connections. Use a pipe wrench to tighten the connections. Be careful not to overtighten the connections, as this could damage the valve or piping.
- Install the valve packing: Wrap the packing around the valve stem and tighten the gland nut to compress the packing.
-
Pressure test: Once the valve is installed, it is important to pressure test it to ensure it is leak-free. To pressure test a globe valve:
- Close the valve.
- Apply pressure to the upstream side of the valve. You can use a hand pump, a power pump, or a pressurized air supply to apply pressure.
- Check the downstream side of the valve for leaks. You can use a soap and water solution to check for leaks. If you see any bubbles, there is a leak.
If there are leaks, tighten the connections or replace the packing.
Figure 2: Globe valve symbol
Maintenance
Proper globe valve maintenance is crucial to ensure optimal performance and prevent costly downtime.
General maintenance routine
The general maintenance routine for the globe valve includes regular inspection, cleaning, and lubrication.
-
Inspection
- Look for wear, damage, or corrosion, especially in the packing, disc, and seat.
- Inspect the disc and seat for erosion and cavitation.
- Inspect the valve for leaks regularly.
-
Cleaning and lubrication
- Use a clean cloth or brush to remove dirt, debris, or foreign material.
- Apply a light coat of lubricant to the moving parts of the valve, such as the stem and packing.
- Lapping and reseating: Globe valve lapping and reseating involves grinding and smoothing the valve disk and seat to ensure proper sealing.
- Packing adjustment: Packing adjustment is essential to maintain a proper seal without causing excessive friction on the stem. Adjusting packing may require specific tools and techniques unique to globe valves.
- Bonnet gland maintenance: Bonnet gland maintenance involves tightening or replacing the bonnet gland bolts or studs to prevent leakage. The procedure varies depending on the valve design.
- Stem and yoke inspection: Stem and yoke inspection involves inspecting and cleaning the stem and yoke, ensuring they are free from corrosion and obstructions. Lubrication of the stem is also important to prevent stem damage or binding.
- Valve orientation and disk alignment: Valve orientation and disk alignment are crucial for proper flow control. During maintenance, it's essential to ensure that the valve disk is aligned correctly with the flow direction. Any misalignment can lead to inefficiencies or improper sealing.
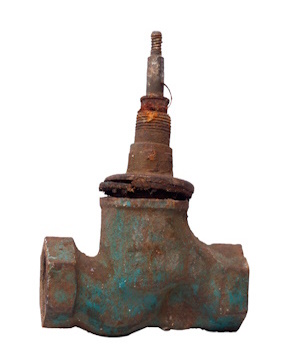
Figure 3: Corroded and broken globe valve
Pressure drop across a globe valve
Globe valves have a higher pressure drop compared to other valve types due to their design, which forces fluid to change direction and flow through a narrow passage. This design is excellent for regulating flow but increases resistance and, consequently, the pressure drop. This necessitates the need for more energy to move fluids through the valve and careful consideration in system design to maintain desired flow rates and pressures.
During maintenance, it's important to assess whether the valve's pressure drop aligns with system requirements. Factors such as sediment build-up, wear and tear on the valve seat or disc, and improper valve sizing can alter the expected pressure drop, leading to operational challenges. Monitoring the pressure drop is crucial for maintenance, as significant changes can indicate issues like wear or blockage, necessitating timely repairs to maintain system efficiency and prevent further damage.
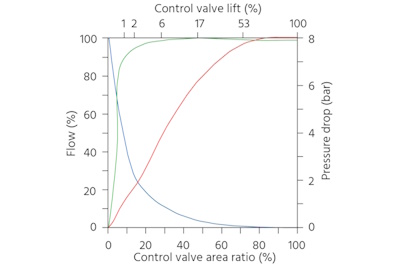
Figure 4: The relationship between pressure drop (blue) and flow rates (volumetric and mass flow rates represented by red and green respectively) for a globe valve. As the flow rate increases, the pressure drop also increases.
Globe valve repair procedure
Globe valves may need to be repaired for multiple reasons.
- Leakage: Globe valves can leak from a number of different places, including the valve stem, bonnet, and packing gland. A leaking globe valve may be due to wear and tear, corrosion, or damage.
- Sticking valve stem: A sticking valve stem can prevent the valve from opening or closing properly. This can be caused by corrosion, debris, or misalignment.
- Damaged seat or disc: The seat and disc of a globe valve are the two components that seal the valve. If either of these components is damaged, the valve will not seal properly and will leak.
- Worn packing gland: Over time, the packing gland can wear out and need to be replaced.
Common globe valve replacement parts include valve stems, discs, seats, packing, and bonnet gaskets. Here is a general overview of the steps involved in repairing a globe valve:
- Isolate the valve: This step involves closing the valves upstream and downstream of the globe valve to be repaired.
- Disassemble the valve: Remove the bonnet, stem, and disc from the valve body.
- Inspect the valve components for damage: Ensure to check the seat, disc, packing gland, and valve stem for any signs of wear, tear, or corrosion.
- Replace any damaged components: If any of the valve components are damaged, replace them before reassembling the valve.
- Reassemble the valve: Once all of the damaged components have been replaced, the valve can be reassembled. Be sure to follow the manufacturer's instructions carefully.
- Test the valve: Once the valve has been reassembled, it is important to test it to make sure that it is sealing properly and operating smoothly.
FAQs
Can a globe valve be installed vertically?
Yes, a globe valve can be installed vertically, and it is a common orientation for many applications, allowing it to control the flow of fluids effectively in both upward and downward directions.
What is the installation orientation for a globe valve?
Globe valves are versatile and can be installed vertically or horizontally, but it's crucial to maintain the correct flow direction for proper function.
Can a globe valve be installed backwards?
No, installing a globe valve backward can impede its function, causing flow control and leakage problems.
What is a globe valve repair kit?
A globe valve repair kit contains replacement parts (packing, gaskets, seals) to fix leaks and restore a valve's sealing ability. It's a cost-effective alternative to replacing the entire valve.


