


How To Adjust a Water Pressure Regulator
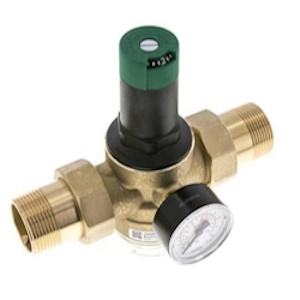
Figure 1: Water pressure regulator with a built-in strainer and pressure gauge
Adjusting a water pressure regulator is an important task that helps control the pressure of water flow in a building. Water pressure regulators are widely used in residential, commercial, and industrial applications; they provide reliable pressure control to optimize plumbing system performance and longevity. This article offers a step-by-step guide to adjusting the regulator for residential applications.
View our online selection of pressure regulators!

Why adjust a water pressure regulator
Adjusting a water pressure regulator is necessary when there are fluctuations in water pressure, whether too high or too low. Typically, the water pressure for a household should be between 2.7 - 4 bar (40 - 60 psi). Here are a few reasons why the water pressure regulator needs to be adjusted or replaced:
- Consequences of improper water pressure: High water pressure can lead to damage, such as loose fittings and water hammer. Low pressure results in slow-filling appliances and reduced water flow. High pressure can be caused from the municipal supply or a faulty regulator. Low pressure can be caused by leaks, pump issues, municipal line work, or a partially closed main valve. Otherwise, the regulator might need cleaning, adjusting, or replacing.
- Improper adjustment: Pressure regulators are typically installed on the primary water supply line entering the building's plumbing network. Occasionally, a pressure regulator might be adjusted to a setting that is too low, causing an excessive reduction in water pressure. Pressure regulators are generally preset to a range of 3.1 - 3.8 bar (45 to 55 psi) at the factory. Nonetheless, it may be necessary to regulate the pressure within a range of 2.7 to 4.8 bar (40 to 70 psi) to maintain adequate water pressure throughout the property.
Water pressure regulator adjustment process
Figure 2: Water pressure regulator parts: threaded male connections (A), adjustment knob (B), filter bowl (C), pressure gauge (D), and housing (E)
Here's a step-by-step guide to adjust a water pressure regulator:
- Locate the regulator and check the water pressure: The water pressure regulator is typically found where the main water line enters the building, often just downstream of the main shutoff valve. A standard installation consists of the main shutoff valve, check valve, filtering unit and the water pressure regulator in order. Please note that some water pressure regulators have an integrated filter (Figure 2 labeled C) and pressure gauge (Figure 2 labeled D). If there is no integrated pressure gauge, attach an external gauge to a connection (such as a washing machine), where one can screw the gauge directly onto the threads meant for a hose. Typical home water pressure should be between 2.7 - 4 bar (40 - 60 psi). If not, it's time to adjust the set pressure in the home water pressure regulator.
- Relieve pressure: Ensure to relieve the pressure in the plumbing system before adjusting the regulator. Turn off the main water supply and open a faucet to drain the water from the pipes.
- Adjust the knob: Turn the adjustment knob (Figure 2 labeled B) clockwise to increase the pressure or counterclockwise to decrease the water pressure. Make small adjustments, as even a slight turn can significantly change the pressure. The adjustment knob usually has a locknut that should be loosened before you can turn the adjustment knob. Use an adjustable wrench or pliers to loosen the locknut. Keep an eye on the setting scale while adjusting the knob. The scale indicates the pressure being adjusting to, by the user.
- Restore the water supply and test: Turn the main supply back on and check if the pressure is within the desired range. If not, adjust the pressure until the correct pressure is achieved.
- Tighten the locknut: Once the desired pressure reaches, re-tighten the locknut to secure the adjustment knob in place.
- Test the fixtures: Turn on your fixtures (faucets, showers, etc.) to ensure they operate correctly at the new pressure level.
- Check for leaks: After the desired pressure is set, inspect the regulator and nearby fittings for any leaks. Tighten any connections if necessary.
Additional tips
- Always make small adjustments to avoid causing a sudden increase or decrease in pressure that could damage the plumbing system.
- Repair or replace the regulator if it does not respond to adjustments or cannot maintain a stable pressure.
- Some regions may have specific codes or regulations regarding water pressure; consult with local authorities if necessary.
FAQs
Can you adjust a water pressure regulator?
Yes, a water pressure regulator can be adjusted, but it should be done carefully to avoid setting the pressure too high or too low.
What psi should a residential water pressure regulator be set at?
It can vary depending on the plumbing system and the fixtures within a home. However, a common range for residential water pressure is between 40 and 60 psi.
