


How To Test a Fuse With a Multimeter
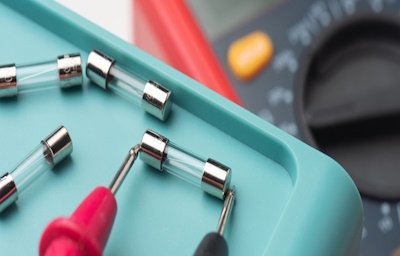
Figure 1: Checking a fuse with a multimeter
A fuse is an electrical device that breaks a circuit under conditions of short circuits or current surges. The fuse contains a metal filament that burns when the fuse blows during a current overload. It is necessary to test a fuse to confirm it is in good condition and can protect an electric circuit or device from catching fire. This article explores how to check a fuse visually and also how to use a multimeter to determine if the fuse is fit for use in an electric circuit.
View our online selection of multimeters!

What is a fuse?
A fuse is an electrical component designed to protect power lines, cables, and equipment from excessive temperature and power surges by safely opening a circuit when an abnormally high current flows through it. A fuse contains a metal element designed to carry only a limited electrical current. When an overload or short circuit occurs, the high current heats the fuse element creating a gap within the fuse, as seen in Figure 2 (right). The gap breaks the current flow through the fuse and the entire circuit, preventing fire. It is necessary to replace a fuse once it has blown.
In some instances, a fuse can blow off even in the absence of a current overload. The fuse wire can get damaged due to moisture buildup, damaged electrical outlets, or by selecting the wrong fuse type for a particular application. Even with a new fuse, it is wise to check if the connecting wire within is free of damage.
How to test cartridge and automotive fuses
A cartridge fuse has a cylindrical shape, and it has contact points at each end, as seen in Figure 2. Cartridge fuses are commonly used to protect electrical appliances like refrigerators, motors, and air conditioners. An automotive fuse is a special fuse type used in vehicles. Both cartridge and automotive fuses can be checked visually for broken wires or tested with a multimeter to verify if they are fit for use.
Checking a fuse visually
Carefully remove the fuse from the circuit with insulated gloves and/or insulated tools. If the glass is clear, the fuse element can be checked visually to determine if it is broken. A good fuse has a connector that connects from one end of the fuse to another, as seen in Figure 2 (left) and Figure 3.
A blown fuse is shown in Figure 2 (right). The damaged fuse has broken or melted connectors, which may appear brown, cloudy, or black because of the melted connector.
Many fuses have a filler surrounding the fuse wire, making it difficult to see. Fillers like sand are used to support the fuse connector and improve the heat transfer, hence delaying the point at which the fuse melts. Such fuses can survive short overloads, and they will only blow when a sustained overcurrent exists. In such cases, the best option is to check the fuse using a multimeter.
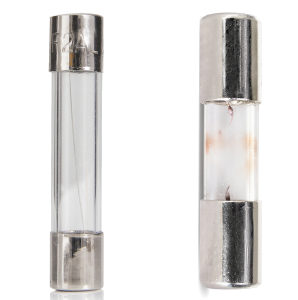
Figure 2: A good cartridge fuse with fuse wire intact (left) and a blown cartridge fuse (right)
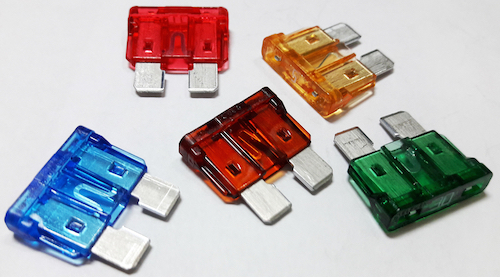
Figure 3: Good automotive fuse with fuse wire intact
Checking a fuse using a multimeter
Use a multimeter to check if a cartridge or car fuse has blown off or if it is still in good condition. Connect the red probe to the VΩmA socket and the black probe to the COM socket on the multimeter. To test a fuse, touch one of the multimeter probes to one end of the cartridge and the other to the other end, it doesn’t matter which probe goes on which side. In the case of automotive fuses, touch the probes to the fuse leads (exposed metal parts).
Note: Before conducting any tests on live circuits, be sure to wear personal protective equipment (e.g., safety glasses, insulated gloves), use insulated tools, and remove watches and jewelry.
Continuity test
- To enter the continuity check mode, twist the multimeter knob and select the symbol corresponding to a propagating sound wave on the panel (Figure 5 labeled A).
- A beep sound indicates a closed connection within the fuse. Hence, the fuse doesn’t have a broken connection, and it is good.
- If the multimeter does not beep and a large resistance value is shown on the display panel, it means that the connector within the fuse is not continuous, and it is broken.
Resistance test
- Twist the multimeter knob to point to one of the resistance values (Figure 5 labeled B) across the front panel (start with the highest value or, using trial and error, choose a value that is closest to the value of the resistance being measured).
- Note the resistance value in the multimeter’s display panel. A small value of resistance (in ohms) indicates that the fuse is good. A large value (in megaohms) shows that the fuse is broken and bad.
Note: Take necessary precautions while checking the fuse. Turn off the electrical equipment (or vehicle in the case of an automotive fuse), unplug the fuse from the main supply, and then remove it before performing resistance or continuity measurements.

Figure 4: Removing the car fuse carefully for multimeter measurements
Voltage test
- Twist the multimeter knob to select voltage measurement. Choose AC (Figure 5 labeled C) voltage if the fuse is installed on an AC circuit and choose DC (Figure 5 labeled A) otherwise.
- Turn on the circuit/vehicle.
- Note the voltage value in the multimeter’s display panel.
- If the noted voltage is close to the applied voltage, the fuse is broken and open.
- If there is little to no voltage developed across the fuse, it means the resistance of the fuse connector is near zero, and the fuse is good.
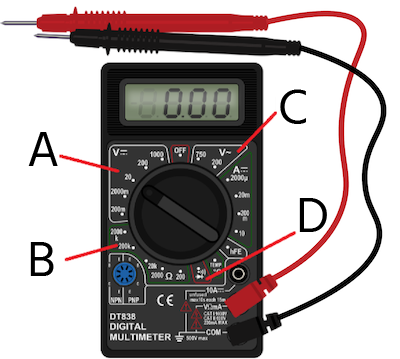
Figure 5: Multimeter showing various measurement modes: DC voltage (A), resistance (B), AC voltage (C), and continuity (D)
FAQs
How do you check if a fuse is blown?
Remove the fuse from the holder and check the fuse wire visually as any dark discoloration or broken wire means the fuse is broken. Alternatively, use a multimeter to check the fuse.
How do I test a live fuse?
Wear insulated gloves and use insulated tools. Use the continuity mode on the multimeter and touch the ends of the fuse. If it produces a beep sound, the fuse is good; otherwise, it is blown and needs to be replaced.
