


HVAC Thermostat Installation
Figure 1: An HVAC thermostat wiring diagram that is typical for many HVAC thermostats.
Proper HVAC thermostat installation helps to ensure an efficiently operating heating and cooling system. Fortunately, this job is relatively simple and can be done by most DIY-ers. However, working with electricity can result in injury and anyone uncomfortable with this work should consult an expert or professional. This guide provides guidance on how to uninstall a thermostat, install a new one, and install a thermostat in a new space that does not already have heating and cooling system wiring.
View our online selection of thermostats!
How to install a thermostat
The following installation instructions assume that an old thermostat is being replaced with a new thermostat. Most DIY-ers should be able to handle this task. However, if there is any doubt or uncertainty about working with electricity, it's best to hire a professional. Installing a thermostat in a brand new space that does not already have wiring is complex and should be handled by an expert or professional.
Before starting
- Turn off the power: Go to the circuit breaker or fuse box and turn off the power to the heating and cooling system to prevent any electrical accidents.
-
Gather tools and materials: Gather the following tools. They may not all be necessary to finish the job but it's best to have them on hand just in case:
- Screwdriver
- Wire strippers
- Voltage tester
- Thermostat and manual
- Labels or tape for marking wires
- Pencil
- Verify the power is off: Use a voltage tester (e.g., multimeter) to confirm there is no power running to the thermostat or the system.
Uninstall the old thermostat
- Remove the thermostat cover: Many thermostat covers can be gently pulled off the base, which is mounted to the wall. Some models might have screws that need to be removed.
- Take a picture of the wiring: Before disconnecting anything, take a clear picture of the wires and where they connect. This can be invaluable for reference when installing the new thermostat.
- Label the wires: If the new thermostat does not have a similar labeling system (see next section) as the old one, use the picture as a reference to label each wire with tape or stickers that came with the new thermostat.
- Disconnect the wires: Carefully disconnect each wire from the old thermostat. As each wire is removed, secure it with tape to the wall so it doesn't slip through the hole in the wall.
- Remove the old base: Unscrew the base of the old thermostat from the wall.
Thermostat wiring diagram
The following thermostat wiring diagram is typical for many heating and cooling thermostats. Learning how to wire an HVAC thermostat is simple because hvac thermostat wire colors are often the same, but some manufacturers might select other wire colors. Pay attention to which wires go to which terminals in the thermostat.
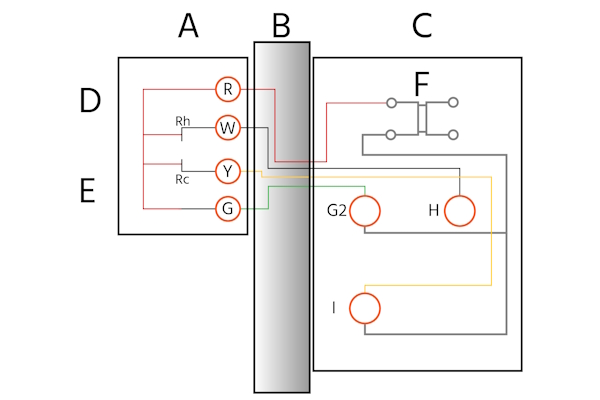
Figure 2: An HVAC thermostat wiring diagram that is typical for many HVAC thermostats.
The wiring diagram (Figure 2) has the following components:
- Thermostat (A)
- Wall (B)
- Heating and cooling system (C)
- A/C heat control (D)
- Fan control (E)
- Transformer (F)
- Fan (G2)
- Heat (H)
- A/C (I)
The wire colors are:
- Red (R): An HVAC thermostat's voltage is typically 24V, which comes from the transformer
- Red heating (Rh): Signals the heating system to turn on
- Red cooling (Rc): Signals the cooling system to turn on
- White (W): Sends the signal to turn on the heating system
- Yellow (Y): Sends the signal to turn on the A/C system
- Green (G): Sends the signal to turn on the fan system
Installing the new thermostat
- Mount the new thermostat base:
- Thread the wires through the new base plate.
- Use a level to make sure the base plate is straight, then mark the wall through the mounting holes.
- Drill holes if necessary (for drywall) and insert wall anchors if necessary.
- Secure the base to the wall with the screws provided.
- Connect the wires: Refer to the picture taken earlier and the installation manual for the new thermostat. Connect each wire to the designated terminal on the new thermostat base. Ensure each connection is secure.
- Attach the new thermostat: Once all the wires are connected, carefully attach the thermostat to the base until it clicks into place or is secured with screws, depending on the model.
- Turn the power back on: Go back to the circuit breaker or fuse box and turn the power back on to the heating and cooling system.
- Program and test the new thermostat: Follow the manufacturer's instructions to program the new thermostat. It's a good idea to test it by running through the heating and cooling cycles to ensure everything is working correctly.
Installing a thermostat in a new space
As mentioned previously, installing a thermostat in a new space or a space that previously did not have heating and cooling is a more complex job. The person who does this job must be an expert in electrical systems or a professional needs to be hired to complete the work.
- Choose a suitable thermostat: Choose a thermostat that is suitable for the heating and cooling system that is or will be installed. Typically the choice is between a line-voltage or low-voltage thermostat. Learn more in our hvac thermostat type guide.
- Determine the best location: The hvac thermostat location is important. It should be away from drafts (i.e., away from windows and doors) and out of direct sunlight. Ideally, it will be installed in a central location in the space. Finally, about 1.5 meters (5 ft) from the ground is considered the space's average temperature.
- Run the wiring: This part of the job makes this a professional job and not something undertaken by the inexperienced. Wires, typically 18 gauge, need to run from the heating and cooling system to the thermostat. This usually means running wires through walls, ceilings, or floors.
- Mount the thermostat: Follow the procedure in the above section, installing a new thermostat, to finish the job.
FAQs
Can I install a home thermostat myself?
Installing a home thermostat is a great job for a DIY-er because it's not a complex process. However, consult a professional electrician if there are any doubts about working with electricity.
Where should a thermostat be installed?
Install a thermostat where it will be free from drafts and direct sunlight, so away from windows and doors. Also, install it about 1.5 meters (5 ft) above ground level.
