


What Is Cross Threading?
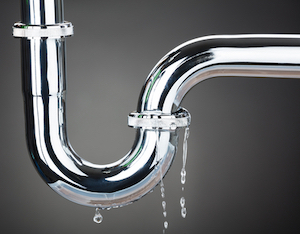
Figure 1: A cross-threaded pipe connection can leak.
Cross threading occurs when a threaded connection engages at an angle rather than straight on. Cross-threading can damage the threading permanently. This article further examines what cross-threading is, how to avoid it, and, if necessary, how to fix it.
An improper, cross-threaded connection leads to the following issues:
- Connections stuck together or unable to connect again once apart.
- Over-torqued connections that may break other system components.
- Connections that cannot hold as much torque as proper connections, leading to unwanted vibrations, noise, and damage.
- Leakage if media flows past the cross-threaded connection.
Table of contents
How cross threading occurs
There are three primary reasons why cross-threading occurs:
- External and internal threads are incompatible
- A user makes an improper connection, i.e., an angled connection
- Foreign material, such as dirt or rust, sits between the individual threads
Incompatible threads
The external thread’s features must exactly match or be compatible with the internal thread’s to avoid damage such as cross threading. The following list is the thread features to understand before pairing threads. To learn more, read our article on thread design.
- Parallel or tapered: Parallel threads maintain a constant diameter across their length whereas tapered threads narrow. If visual inspection doesn’t work, use calipers to determine if a thread is parallel or tapered.
- Pitch: Metric thread pitch is the distance, in millimeters, between consecutive thread crests (high points). Standard thread pitch is threads per inch (TPI).
- Diameter: Use a caliper to determine an external thread’s outside diameter and internal thread’s internal diameter.
- Thread standard: Some common thread types are unified threads (UN/UNF), American pipe threads (NPT/NPTF) and British standard parallel or tapered pipe (BSPP/BSPT).
Note: Learn more about measuring pitch and the various thread standards by reading our thread standards article.
Improper connection
Another common cause of cross-threading is the external thread screwing into the internal thread at an angle. The external thread carves new threads in the internal thread or wedges together existing threads (Figure 2). If someone, a mechanic, for example, uses their hands to initiate the connection, it will quickly become clear that there is an issue. Tools, however, cannot always give such precise feedback. A rushing or novice mechanic may initiate the connection with a tool that has enough power to overcome the cross-threading force that acts against tightening. This results in a tightened and cross-threaded connection that cannot hold the same amount of torque as a properly aligned connection. This can lead to vibrations and loud sounds at a minimum. Conversely, failed connections can lead to severe component damage and endanger human life. Finally, leaking becomes a concern for cross-threaded pipe and valve connections. For example, plastic pipes are prone to leakage due to their threading’s softness being malleable.
Foreign material between threads
The third common cause of cross-threading is dirt or debris between the threads. Foreign material can lead to the threads improperly aligning, which leads to damage upon tightening. Therefore, it’s essential to inspect fasteners for debris and rust and clean used fasteners with machine oil before reuse.
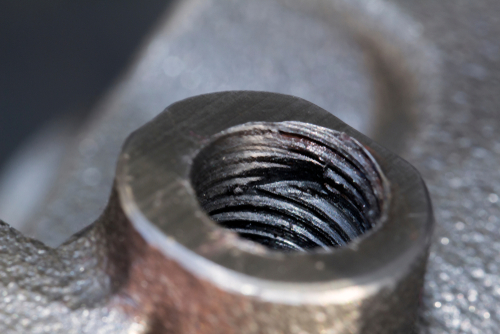
Figure 2: Damage to internal threading caused by cross threading.
What has threading?
A threaded connection is one of the most popular types of connections found on components and machines. This article takes a closer look at how cross-threading affects fasteners, pipes, and valves.
Cross threaded fasteners
A commonly cross-threaded fastener is the lug nut and lug stud on a car tire’s hub. When cross-threading occurs, it becomes very difficult to continue tightening the lug nut. An incorrect solution for all threaded fasteners, not just a lug nut, is to increase the torque to force the tightening. Instead, loosen the connection to start over.
Cross threaded pipe fittings
Cross-threaded pipe fittings often leak, even if the fitting has Teflon tape or pipe dope working as a sealant. Due to their softness, plastic pipe fittings require extra care when installing since they are more prone to cross-threading. If a cross-threaded pipe fitting is removable, attempt to fix it using a tap-and-die set. However, if the fitting is not removable, saw it off with an appropriate tool, such as a hacksaw, and replace it. This is more expensive and laborious since the piping may need replacing or rethreading.
Cross threaded valve connection
As with pipe fittings, cross-threaded valve connections tend to leak. When installing a valve with a threaded connection, always ensure the connection is straight on, and there is no dirt or debris in the threading. If enough thread material remains, rethreading the valve’s connection is possible using a tap-and-die set. However, if there is insufficient material remaining, valve replacement is necessary.
How to avoid cross threading
The previous section shows that cross-threading can easily occur and can very quickly require an expensive fix. Therefore, the following guidelines help prevent cross-threading to save time and money.
Work slower
One of the leading causes of cross-threading is rushed and careless work. Without proper care, a user can easily overlook an angled thread connection. A common example is a mechanic screwing nuts onto lug studs with an impact socket. This tool is ideal for quickly tightening the lug nut, but it should not start the process.
Start tightening by hand
A mechanic using their fingers will feel a bad thread connection much sooner than a mechanic only using a tool. If it is difficult to screw a threaded connection together by hand at the beginning if the connection is not straight. Cross-threading can occur if tightening continues.
Ensure the threads match
Due to the variety of thread types available, many threads are similar but not identical. Slight differences between the external and internal threads can cause cross-threading.
For example, someone living in the United States may need to attach a pipe to an appliance they purchased from a European country. More likely than not, the device requires a British Standard Pipe (BSP) thread connection. However, National Pipe Tapered (NPT) connections are predominant in the United States. Connecting an NPT fitting to a BSP connection can easily lead to cross-threading.
Turn in the opposite direction
A fail-proof method to ensure the threads are in proper alignment, not at an angle, is to turn the connection opposite the tightening direction first. For the majority of thread connections, this means turning counterclockwise. Turn until hearing a clicking sound. This means that the threads are in alignment, and tightening can begin.
Use coarse threads
Coarse threads, meaning threads with a relatively greater distance between individual threads, are less likely to cross-thread since there is more space between the individual threads. More material can sit between the threads without throwing the alignment off.
An NPT fitting with 13 threads per inch (TPI) is coarse, whereas a fitting with 20 TPI is fine. A metric fitting is coarse if there is 1.5 mm between consecutive thread crests, whereas a fitting with 1.25 mm between crests is fine.
FAQs
Can cross-threading be fixed?
Threads that are too damaged by cross-threading or threads without enough material cannot be fixed and must be replaced. Despite these two cases, cross threading is fixable using a tap and die set.
What is cross threading, and how does it happen?
Cross threading is damage to threads, potentially rendering them unusable. It occurs when a threaded connection begins at an angle instead of straight or if debris is in the threads.
How do you stop cross-threading lug nuts?
First, turn the lug nut counterclockwise until hearing a click. This means the threads of the nut and stud are in alignment. Turn the nut clockwise by hand to tighten it.
