


A Comprehensive Guide to Gate Valve Uses and Repair
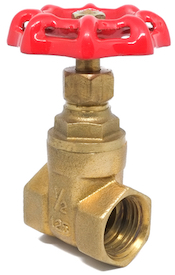
Figure 1: Gate valve
A gate valve allows the media to flow through freely or stops the fluid flow completely. Gate valves are used in the power, waterworks, wastewater, pipeline, oil and gas production industries, and commercial buildings. When undertaking new installations, maintenance, or repair works, gate valves help isolate certain areas in the water supply network or reroute fluid flow to desired pipeline sections. Gate valves can sometimes get damaged. The following guide discusses case scenarios of when these valves might need repair and the steps to make repairs.
Table of contents
- What is a gate valve?
- Gate valve issues
- How to take apart a gate valve for repair
- Replacing a gate valve with a ball valve
- FAQs
View our online selection of gate valves!
What is a gate valve?
Gate valves are control valves used to shut off fluid flow completely or provide unobstructed flow within a pipeline. A gate valve consists of a valve body, gate, seat, stem, gasket, and a wheel for operating the valve, as seen in Figure 2. The gate and seat together perform the function of shutting off fluid flow. Read our article on gate valves for more information on a gate valve’s working principle and the various types of gate valves.
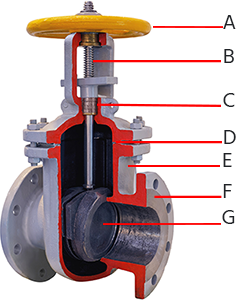
Figure 2: Gate valve cross section: gate valve (A), handwheel (B), stem (C), gasket (D), bonnet (E), valve body (F), and flange (G).
Gate valve issues
Several issues can affect gate valves. Handling each problem effectively helps avoid further complications. The most common causes of gate valve failure are corrosion and general wear and tear over time. The following sections summarize some of the main challenges gate valves face and how to troubleshoot and fix them.
Gate valve fails to close
Troubleshooting
A gate valve can fail to close as expected when sediment builds up inside its body. Sediment buildup occurs mainly when the gate valve operates fully open for a longer time than expected, causing dirt to build up at the sides and preventing its closure. The sediments get stuck between the gate and valve’s interiors when the gate lowers, causing problems.
How to fix the problem
- Start by closing the gate valve as far as possible. Please note that excessive pressure should not be applied during this step.
- Open a sink faucet to flush debris out of the system.
- Open the gate valve as far as possible.
- Repeat the opening and closing cycle until the gate seats altogether, or the gate stops making any progress towards closing. This action usually breaks loose and flushes any built-up debris out of the valve. If the valve doesn’t show downward progress without shutting off the water flow, it needs to be taken out for evaluation. Switch to Step 5 if this happens.
- Shut off the water supply and remove the gate valve.
- Use a wrench to remove the valve housing from the top. Ensure not to loosen the packing nut that holds the packing and prevents water from leaking around the handle.
- Evaluate the outer edges of the gate and scrape off any deposits before reassembling the valve.
- Slide the gate back into its guide and tighten the top of the valve housing using a wrench.
- Turn on the water supply and test the valve again.
- Replace the valve if it is severely corroded or filled with debris.
Gate valve stuck
Another common challenge with gate valves is that they can get stuck. The gate valve can be seized open or closed, due to which it cannot perform its function correctly.
Troubleshooting a stuck gate valve
Perform the following steps before checking a stuck gate valve:
- Stop the water flow to understand the problem better.
- Isolate your working area to avoid the adverse effects of further leaks.
- Examine the area to understand whether there are external factors that cause the problem, like excess cold or a damaged water line. Wear and corrosion can also prevent gate valves from opening.
- Place a container under the damaged valve to drain the excess water (in case the gate valve is seized open) before removing or fixing it.
How to fix a stuck gate valve
- Clean any atmospheric deposits from the gate valve threads.
- Apply 3-in-one or penetrating oil to the gate valve. Wipe the excess oil with a rag and ensure that the oil reaches the valve's threads.
- Tap the valve handle with a hammer to check if the valve changes position from open to closed.
- Attach an adjustable wrench or channel lock on the valve handle. It is advisable to wear gloves while working to avoid slipping and ensure a stable working surface.
- Warm the handle using a hair drier or blow torch.
- Turn the valve handle to check if it changes the valve position.
Gate valve leaking from stem
Old and new valves can leak around the stem section, mainly when the valve handle is turned to open or close the valve. Several reasons can cause this leakage: not often fully closing the valve, damage to the valve, poor design, and using the wrong size gate valve.
Troubleshooting
- Tightening: Turn the gate valve handle to check if the leakage is caused by the valve failing to close. Gate valves fail to close fully when sediment builds up inside the valve's body.
- Damaged valve stem: Check whether the valve’s stem area has been damaged. Wear and corrosion are the most common causes of such damage.
- Check the design and valve size: Ensure that the valve stem is compatible and designed for your specific valve. If not, replace the valve stem.
How to fix the problem
- Tighten the packing nut. The packing nut makes a strong watertight seal where the valve stem meets the water line. So, if there is a leak at the valve stem, it likely means the valve is not completely stopping the flow. Hence, the first step you should do to stop the leak is to tighten the packing nut.
- Replace the valve stem packing material or washer. When the gate valve’s packing nut is tightened, it confines the packing material against the washer to prevent any water from passing through. This packing material hardens over time, forming a solid seal that causes the valve to leak. In this case, it is better to replace the stem packing material, which can be found at most hardware stores.
How to take apart a gate valve for repair
Perform the following steps to take apart a gate valve for repair:
- Turn off the main water supply.
- Detach the valve from the pipes by unbolting the flanged ends.
- Loosen the valve bonnet using pliers. Do not loosen the packing nut because this part ensures that there are no leaks in the stem.
- Remove the valve's top to separate the seating and handle from the body.
You can now examine each part for possible faults. Use a cleaning tool such as a toothbrush to clean each valve part. If there are any faults, replace the affected parts; else, start the rebuilding process. When rebuilding, place the gate in the appropriate position in the valve's body, then screw the bonnet until it is secure. Now turn the handle to see if the valve is working. The gate should be able to open and close fully. If all is well, place the valve back on the pipeline.
Note: It is advisable to use industrial valve sealant tape to put the valve back in the pipeline.
Replacing a gate valve with a ball valve
Always go for ball valves rather than gate valves whenever possible. Ball valves are generally more effective, although they are more expensive. Ball valves form a tighter seal when closed, and they are more reliable and durable than gate valves. Perform the following steps to replace a gate valve with a ball valve:
- Heating up: Before replacing the gate valve, get a torch to heat the parts (valve joints and handle stem) for removal.
- Turn off the water: Drain the water from the pipes by turning it off. Then, open the gate valve and heat the valve joints.
- Use channel locks: Grab the valve with a hammer to see whether it moves. If it does, it is hot enough. If it does not move, apply heat on adjacent elbows and some lateral pressure.
- Final installation: Now install the ball valve.
Read our gate valve vs ball valve article for a thorough comparison between both valve types.
FAQs
Are ball valves better than gate valves?
Yes, ball valves have less response time and better sealing properties than gate valves.
Which tools should I keep in my gate valve repair kits?
Get a seat removal tool, a screwdriver, and a wrench set.
Can gate valves fail?
Yes, gate valves can fail due to wear and corrosion and must be troubleshot for possible faults.
Why is my gate valve leaking?
The gate valve can leak due to the lack of complete closure, damage, poor design, or the use of the wrong size with its application.
