


Foot Valve vs Check Valve
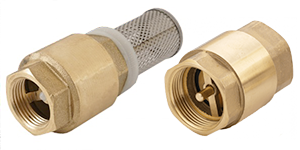
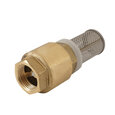
Figure 1: Foot valve (left) and check valve (right).
In short, a foot valve and a check valve are very similar in that they automatically open or close depending on system pressure, allowing flow in only one direction and preventing backflow. Figure 1 shows a check valve on the right and a foot valve on the left, with the main visual difference being that the foot valve has a strainer on it. Given the similarities between the two valves, there are important differences. Foot and check valves have different installation locations in a system, different material requirements, and different designs. This article will focus on these key differences. Read our comprehensive articles about check valves and foot valves to learn more about each type of valve.
Table of contents
- Operation principle
- Differences between check valves and foot valves
- Foot valve and check valve P&ID symbols
- FAQs
View our online selection of check valves!

Operation principle
Understanding how check and foot valves work is helpful before discussing their differences. Both valve types open when the inlet pressure is above the valve's cracking pressure. The cracking pressure is the minimum amount of pressure required to open the valve and overcome the force keeping the valve closed (spring or gravity). When the inlet pressure reduces below this limit, or there is backpressure, the valve closes shut.
Differences between check valves and foot valves
Design
Foot and check valves have a variety of design types, for example, ball check valves and ball foot valves. This section, though, focuses on the design differences that exist between all check and foot valves.
- Screen: The first visual difference is the screen attached to the foot valve's inlet end, which is often called a strainer or filter. Foot valves typically sit submerged in water in a well. The screen prevents larger debris from entering the foot valve and sticking the valve's disc open and damaging other components within the system. A check valve does not have this protection and therefore is not applicable for media that has large solids in the flow.
- Threading: A check valve has threading on both sides. So, a check valve fits into any part of the piping deemed appropriate. Removing a section of the pipe and installing a check valve is a straightforward process. Foot valves, however, have threading only on one side. Therefore, foot valves are only suitable for the end of a pipe, which is the end of a pump’s suction line.
Material
The key material difference between foot and check valves is that foot valves are in water for the duration of their use. Therefore, whichever material selected must be corrosion resistant. Materials often chosen are PVC, heavy-duty cast iron, bronze, and stainless steel.
Check valves have a wider range of material options because they operate in a wider range of environments. When selecting a check valve material, first understand the system's pressure, temperature, and operating environment. Read our chemical resistance guide to learn more.
Installation
Because foot valves work on pump systems, this section will only cover the installation locations of check and foot valves on these systems. Both valves stop media from flowing back into the well when the pump turns off, thus keeping the pump primed.
A jet pump uses a foot valve at the very end of its suction line. In contrast, a submersible pump has a foot valve directly installed on its inlet. Both pump systems can use check valves in the same locations. However, this is not suitable for any wells that may contain solids large enough to get stuck in the valve and hinder its operation.
Deep well systems use one or more extra check valves along the suction line to protect the submersible pump and foot valve from the water column’s pressure. Shallow well systems may have a check valve on the suction line. Also, check valves can install directly at the jet pump’s inlet or between the jet pump and pressure tank. Beyond stopping backflow into the well, check valves are applicable anywhere where backflow may damage an upstream component or contaminate upstream media.
Foot valve and check valve P&ID symbols
Figure 2 depicts a check valve symbol (left) and a foot valve symbol (right).
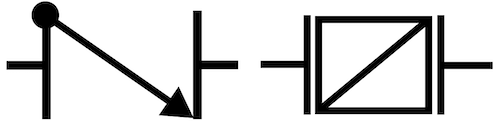
Figure 2: Check valve symbol (left) and foot valve symbol (right).
Summary
Table 1: Comparison between foot valve and check valve
| Foot valve | Check valve | |
| Design | A foot valve has a strainer on the inlet side. | A check valve does not have a strainer. |
| Material | Foot valves have a limited selection of materials: stainless steel, heavy-duty cast iron, PVC, and bronze. | Check valves have more material options because they do not rest in water. |
| Application | Foot valves are used for suction lift applications, like a well pump. | Check valves are applicable for pump systems and any system that requires backflow prevention. |
| Installation | Foot valves only go at the end of a pump’s suction line. | Check valves can go at the end of a suction line, in the middle of the suction line, and anywhere else in the system where necessary. |
| Threading | Foot valves have threading on the outlet side only. | Check valves have threading on both sides. |
FAQs
What is the difference between a foot valve and a check valve?
A foot valve has a screen on its inlet side to prevent large solids from entering the valve. Also, it fits at the end of a suction line in a pump system. A check valve is suitable for any system, including pump systems, that require media to flow in only one direction.
Can a check valve be used in place of a foot valve?
Yes, a check valve can be used in place of a foot valve. However, check valves do not have a protective screen and any large solids in the media can stick them in the open position.